Wednesday, December 10, 2014

Berbers in Blue....


The previous post outlined the colours and methods for fast tracking the painting of the dark clothed berbers that form the basis of my Almoravid army around the time of El Cid (c. 1090s).


In this post some snaps showcase finished figures, formed into their units. The basic building block I've been using is 12 figures for infantry and 6 for cavalry. Added to the Infantry I've included a couple of extra command figures per unit so that I can use my sabot base system to create 'units' for a game such as Hail Caesar and drop these figures to make skirmish units of 12 soldiers i.e. six spearmen and six archers. Nothing hard and fast in this off course, but that's how I'm putting my force together.


The army is not yet complete as other infantry types need to be added such as Black Berber foot and white clad Arab-esque infantry that can double up for all manner of Arab type infantry. Then there is cavalry to add as well. I've finished up a few character figures which need to be added to the force for 'skirmish' games or can be used as dressing in larger scale actions.

Overall I'm pretty pleased with the results given the speed of painting of these minis. I'd say out of a Gripping Beast box of 40 figures there is about 1.5 to 2hrs of putting the figures together and about 6 hours of painting and basing...not a bad return for your time I think.


For now however, here are some shots of the Berbers in blue.....


...a small unit of skirmishers...round shields are GB plastics, Adarga shields from Eureka Miniatures...


....a standard sized unit for Lion Rampant...or in El Cid's Spain...Leóne Rampante!


...three units of combined Spear and Bow for use in Leóne Rampante plus a skirmisher element...


...Cattle are Empress miniatures and buildings from Touching History...(unfortunately no longer available)...


...death to the infidel!...


...Ben Yusuf surveys the field before him...
...Yusuf by Gripping Beast (also yellow shield guard). Prophet by Artizan and Drummer from Eureka Miniatures on a converted Colonial donkey!...


...tent by Baeuda...very nice!


"Then fight in the cause of Allah, and know that Allah Heareth and knoweth all things."


Sunday, December 7, 2014

Painting African Invaders


Gripping Beast 'plastic' Spearmen, commanded by a Eureka leader (white shield) under the eye of Ben Yusuf (GB),
with his champion by his side (Eureka), listening to the word of the Prophet (Artizan).


Color choice for the Almoravids is not as simple as it would seem...although it can be if your not too fussy and want to really fast track your painting.

The image we have of the Berber infantry clad in black garments like those portrayed in the movie El Cid and popularised by the elite African unit the 'Black Guard' would suggest that black was the obvious choice. Of course it's not as simple as that, however, painting Almoravids in black is certainly an option that makes a lot of sense. The 'black' that we perceive the uniform/garments of the Berbers to be in is actually a deep/dark blue. 

As I was after a rather sinister look for the Berbers I tried some 'black clad' berbers to see how they'd turn out. After having completed some test samples I settled on not doing the army in black and opted for the more historically 'correct' colour of deep blue. City dwelling Berber's could be painted in a more typical white coat but I was going for a fairly 'non specific' look that created the sort of force that would look distinctly different to any Taifa Andalusian or Christians. 

Basically, I'm not going to get hung up on which tribes wore what dress etc, etc. I wanted my fanatic North African berbers to be in dark garments and blue to my eye is the best balance between being historically plausible, easy to paint and visually striking. 


Black...nice, but I didn't think a hundred of these was going to give me 'the look'.


Another reason I found working against the colour black was that on-table black can rather disappear as a colour and from a painting perspective I find black a very hard color to highlight 'properly' using a dry brush technique. From viewing distance on-table I also found figure details got lost a bit with black. I like to be able to 'see' the minis I've painted from arm's length and take a few snaps as well so black is probably one of the worst colours for doing that. So rather than go down the easy route of painting all my minis black, dark blue still seems like the best compromise.


This colour is no better shown than by some pics of the Artisan figures below that are very nicely painted in this dark blue colour. These figures give that 'black' look but are I think, a bit richer in colour and overall a nicer look....though still quite dark.


pics of Artizan minis from their website.


...and these very nice figures (below) are lovely. In fact it is these which I am going to model my style off..


(I can't recall what website I found these pics, but for me these pretty much nailed the look in my opinion).


This slightly brighter blue is a better colour to best reflect the actual colour of the Berber infantry viewed from a distance and it's pretty easy to paint. Painted a bit 'brighter' it can still conveys a dark blue colour and a somewhat menacing look, which is what I am trying to achieve with the berbers. Even though I've settled on blue for the bulk of the Berbers, other colour combinations can be used, typically white for some tribes, and multi coloured patterns as well, but the dark blue is going to fit the bill and be easy to get volume painting done whilst still retaining some good quality results....dark blue it is.

Taking a very broad brush approach to it all I am going to go for my North African Berbers in a dark coated colour, Andalusians in white-ish colours and Spanish Christians in more earth tone colours. This would create a diverse colour palette on table and make for visually striking armies..at least that's what I hope!

So to that end the colours and method of painting these as a simple as could be.

1. Undercoat Black.

2. Paint the entire figure with Vallejo Prussian Blue, then a dry   brush over that with the same colour lightened up a bit by adding white. You can/should be reasonably aggressive with the dry brush, almost to the point of 'too much' to ensure that after the army painter dip is used some highlights still show through.

3. Block in the head scarf colour which I have used Foundry paints Vivid Blue C [22C[.


Berber archers

This stage gets the figures done really quickly as it is just a matter of block painting of the simplest kind.


From there the details are added which really don't amount to that much. The plastic GB figures are pretty 'light on' for details and with the application of just a few shades of brown and some cream coloured belts, etc, the figures is pretty much done...simple but effective. The spear was given a dark brown base and then a buff colour topcoat paying attention to leaving gaps to reflect the look of bamboo, which their spears were made from. When the entire figure is finished the army painter dip will blend it all together.

Spears - You'll notice in the pic below the spear armed figures is holding a bamboo spear (different to the one in the pic above). This is not what comes with the GB plastic arabs. I drilled out those spears and put in place a Eureka Miniatures bamboo spears which really are quite nice (and sturdy). These are part of an Almoravid range that Eureka has, as mentioned in a previous post. I've done this for some but not all of my figures just to see how they came out. Overall I'm please but I don't have enough for the entire army so won't be converting all the minis this way.

Bamboo spear added to GB figure on the left, next to the Eureka Almoravid mini.


With the figures all painted the next stage is the army painter dip. The Dark Tone is the shade you are after. A fairly liberal covering is what you're after, being careful to go back and 'pick up' some (not all) of the puddled dip. A little bit of 'puddling' in the detail of the figures actually works quite well as the shade for dark blue is black and thus the dip naturally shades the figure and gives it that 'dark blue' look I am after. You can see this effect nicely in the pic above.

After it's all dry (24 hours +) hit it with Army Painter Anti-Shine (very good stuff). As a final option, because the anti-shine is so effective, the figure can appear a bit to 'dead flat'. This can have the effect of making some of the detail disappear a bit and the coat can lose a bit of 'depth'. Therefore, I use a finishing coat of an artist's spray I have that is called a matt varnish but it really is like a very light satin sheen. It just give the final figures a lift and adds some depth to the blue coat which is the majority of the figure that you look at. After all this is complete the figures are ready for the final touches.

Side Note- for me, this system really lends itself to 'barrage painting'. I have found it's much easier to paint all the figures in one go, as you really only need to apply just a few colours of paint in each stage before you take a break. This repetition I found made painting them quite easy and produced fast results.


Note the small bits of wire I used on the archers as he draws his bow....a detail that brings the figure a little bit 'alive' and makes the figure look a little more dynamic. You can see how 'flat' the figures look after the anti-shine is applied.


...all at once! I also 'paint edge' the bases before applying the AP anti-shine to give some more added protection to the base colour as well to prevent chipping.


Shields
The Shields were very easy to do. Simply paint them in three shade of brown...I used the Foundry triad 'Bay Brown 42'. Lay them face up (to you) so that when you apply army painter dip it pools and drains such that it gives an even coverage over the shield rather than pooling at the bottom of the shield which is what happens if the shield is affixed to the figure first (vertically) and not after the figure is painted. This is the same technique I have used on my Sumerian shields.


Basing
At this stage it's a simple flock and your off. The basing system I use is to mount units in a sabot for unit based games and still allow for the single figures to be used for skirmish based games. Whilst this might not be best applied to all armies I find that for the investment in 28mm figures this is often a smart approach, at least for the initial stage of an army build, as figure count is usually lower for skirmish based games instead of battle games and you can get going ASAP with some games with individually based minis. The GB plastic arabs take up a lot of the 'space' on these bases and still provide good density to the 50mm x 50mm base as well as complete variation as each figure can be swapped and changed as desired.


...these figures have had that finishing 'matt varnish sheen' applied and look just a little 'smoother' and the blue is just a touch 'richer' in colour.


You can see that the steps in painting these are really pretty straight forward and in fact the customisation of the figures and green stuff-ing, etc, really makes them look more Berber than Arab in my opinion and makes the final product look unique and suitably Berberish....is that a word? ;-)


..next post we'll showcase a few completed units and see how the army is starting to take shape.....


Thursday, December 4, 2014

Berber infantry conversions

In the last post we looked at a number of options for putting together a force of El Cid era berber troops. Settling on the Gripping Beast plastic figures range supplemented with metal minis from a number of manufacturers as previously described.

Here we look at how I intend on using the plastic Arab GB set for my Berber infantry.


The figures below are made up from the parts of the GB plastic Arab set made up of 8 identical sprues. Overall the poses that you can create are about a 7.5 out of 10 in my opinion. The figures are perfectly usable, dynamic and varied, however, I think they lack a subtly of pose positioning that the Perry's so elegantly achieve with their plastic sets (check out their Wars of the roses range for example). This is perhaps a bit harsh and frankly not that much of a big deal, but it is worth noting that multi pose does not always equate to multi pose 'natural' positioning. 

Anyway, that aside, these are what we are working with so we shall make the most of the poses that can be created whilst still striving for as natural a posture in the figures as possible.


There are lots of options on the sprue which allow for a number of figure types to be created. They can be spearmen in a number of poses and a smaller selection of poses avalaible for the archers. The The sprue also allow for making command figures and a horn blower and some easy conversions for standard bearers. So there is a lot of versatility from this one sprue....despite my comments above, you can't get as much variation from the one figure range greater than what this sprue can produce....and for that they get high marks.

However one thing that I do want to 'correct' about these figures is the quite forward thrusting arm on a couple of poses...they seem a little awkward and 'unnatural' to me (see my comments above about the Perry stuff). Carrying a shield would generally be done a little closer to the body and when the shield is mounted the forward thrusting arm looks a little odd. I'm going to do a bit of surgery to correct this. I plan on using the Artisan shields for these figures (below) which will give me more of the 'Berber' look I'm after (replacing the teardrop and circular shields). The GB shields are fine and I shall use some, but the bulk of my infantry are going to have hippo shields like these (which are sold very conveniently in packs of 40!)


Whilst the arm pose is not a major issue I'm going to correct this by  cutting the forward thrusting arm near the elbow at a suitable angle to take the large hippo shield. This will also give me a solid 'join point' to secure the shield. The 'chopped off' arm can be trimmed and glued on the inside of the shield if you feel you want to complete that bit of detail, but I've found that the shield is tucked in enough that is really isn't noticeable once the shield is on the figure  and held close to the body.


So here are a few put together, minus the shields that will be put on after the figures are painted.


A few points worth noting. The obvious one is that the inclusion of a face veil is 'the look' to turn your standard Arab Saracen type into the more sinister looking North African Berber Almoravid warriors. This was easily enough done using some green stuff that is rolled quite thin and then simply placed and 'worked' onto the face of the model. When working with green stuff use water on the surface it is placed and on your 'working tool' to prevent the green stuff becoming sticky and unworkable. There are some good online tutorials on using green stuff that show how to use this product.

I was a bit dubious at first as to whether these would look right or be hard to 'work', but it was surprisingly easy to do and quick. You'll note in the left of the picture there is an Arab I have painted in green with a yellow head scarf (in the background). This headscarf is the usual one that comes with the plastic arab set (along with one similar styled head dress - see sprue above) but there are not enough on the sprue to do all the figures in the box and the variation using the green stuff gives a much nicer look in my opinion, instead of the 'cookie cutter' two head scarf styles that the sprue gives you...so a bit of extra work here pays dividends on the finished figures.


Getting a little more creative with that green stuff I've added some spear tassels and some helmet 'wrap arounds' onto some of the figures to create yet more variation and give them a unique look. The idea is to create as much variation as possible whilst making them more or less look similar. The standard bearer is made with a simple drill hole through one of the existing standard soldiers hands appropriately armed with a sword as mentioned above....very simple stuff.


Here is a shot from behind showing a bit of the green stuff used to create backflaps flowing off the head dress to break up the overall garment a bit and make them less 'the same' when there are lots of them put together in a unit. I've also added some detail on the waist of a few to create further variation. 


So from the standard plastic arab set we can now get quite a good deal of variation from the one sprue and by and large no two figures look the same, though they all look similar...which is the look I'm after.


Ok, that'll do for this post. We have the figures assembled, have chosen the shields to use on the models, added elements to make them distinctly Berber in style using 'green stuff' to make face veils, and created a lot of variation using the single box of plastic Arab saracens to make them look like Ben Yusuf's berbers...a good start.

..in the next post we'll talk a bit about colour for these troops and how to get them painted in short order....


Monday, December 1, 2014

Berber Figures


Figures

In this post we'll look at figures that are available and the reasons for choosing one brand over another. The list below does not represent all the figures that can be used but rather the ones that fit my requirements for this particular project.

When it comes to figure choices there are lots! Here are a few points to think on....

Priorities – compatibility, variation and quality in roughly equal measure. With that list then what’s on offer?


Gripping Beast El Cid range – a comprehensive range that for mine lacks a bit of variety for skirmish games but with poses quite suited for battle games. That said, there is enough in this range for a good variety of types likely to be encountered in a typical Skirmish Game based force, but the size is a touch small compared to the Gripping Beast Arab plastic boxed set and Artizan figure. The plastic figures do size well with the Crusade range from GB and I suspect they were sculpted to match that 'heftier' range of figures.The metal arabs do mix well with most Perry and Crusader figures and are generally no problem in the same or separate units. 

One thing to watch out for is size variation across figure ranges. GB seem to employ different sculptors or at least sculpt different sizes for some ranges. I ordered some Norman command figures and they are tiny in comparison to just about everything I have in heft and to a degree, size. They are very slight and won't be seeing service in the Reconquista!


Those Norman Command figures are tiny...nice sculpts though!


Gripping Beast (plastic boxed sets) – The plastic Arab Infantry set provides a large variety of posing variation and conversion possibilities, so they receive high marks for my needs. Their price point for large armies also is a plus and they are compatible with the other GB Dark Age warrior sets so there is a good deal of variation possibilities here. They mix best with the Artizan range and some packs of the Perry minis (which tend to be a bit smaller overall). 


Perry Miniatures – by far the most comprehensive range for cavalry in their First Crusades range and many useful packs of infantry. Some are a bit small however, but the Armenian Archer pack (for one) are a touch bigger and do rather well for Spanish infantry archers (as allies for the Almoravids). These figures match the GB plastic arabs also. The cavalry from the Crusades range and from the Sudan range, using the Baggara Horse, provides a good deal of variation for Arab cavalry types. With some Green stuff face veils which can easily be put on they should come up well. The Hopitaller Knights fought in Spain and the Perry First Crusade Hospitallers will fit the bill for the early military orders of the 12th century.


The Perry archers and GB Warriors go together nicely for Spanish or Andalusian Peone infantry 'bow and spear' units.


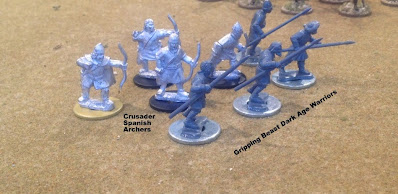
Crusader Miniatures – these guys do a specific El Cid range! The figures are cleanly cast, a touch squat, but otherwise quite compatible and are lovely sculpts, quite easy to paint…these will find their way into the Christian Armies and Mercenary forces, often allied to the Almoravid/Almohades forces. The separate ‘Spanish Shields’ packs are excellent to pick up to add to GB plastic infantry and Conquest Games cavalry forces. I was going to add these Spanish archers to the GB plastic foot as Peone infantry for the Christians, but have decided the Perry are a nicer fit with more variation in posing as well

Note - the pics below (and above) have shots with the plastic Dark Age Warrior sets, which are smaller and closer to the Perry's in size. The plastic Arab set is bigger and you can see the size of them in the shot with the Black Tree figures below, which are on the bigger side also. Please also note the pics are taken to give an impression of size. I can say all these figures have nice detail levels and reward a good paint job and take the army painter/wash style of painting....my camera work was not the best in these pics.


The Crusader figure are nice, but the Perry Armenian Archers mix better with the Dark Age Warriors,
which are a touch smaller and slighter than than the Crusader, Artisan and BTD figures.


Artizan – they do a specific Almoravid range, so at first glance they seem like the natural choice. However they do lack a bit of variation in posing for skirmish games for mine, and even if you want massed forces then the one or two codes for a specific type to me means these minis fall down in the 'variation' criteria I laid out as a priority (for me). However they are excellent figures and blend well with the GB plastic Arabs so there is still much to use in this range, so they are recommended. I plan on using the Artizan Black Guard shield pack for near all my Almoravid forces, ditching the more Arabized teardrop shield look, opting for the more sinister hippo shields that are quite distinctive.


Conquest Games – similar to Crusader, their Norman cavalry and infantry boxes will make excellent troops as allies for the Almoravids and enemies as well. The Norman cavalry box is particularly good and with enough equipment and armour variation the Christian Caballeros Hidalgos, Caballeros and Caballeros Villanos can, for the most part, be made from the one box. Use the Spanish shields packs from Crusader Miniatures to make the figures more Iberian will help in this transformation. The Norman Infantry box does nicely for more heavily armed or equipped mercenary types.


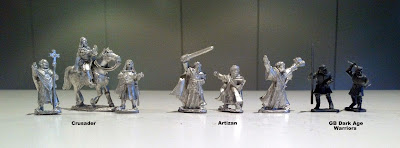
The GB Dark Age Warriors vs the Artizan show the largest 'size spread'.
The Artisan minis are chunky and the GB not so, but with a shield in a massed or dispersed skirmish unit, they will do fine.


…all of the above figures fall into a high standard of figure sculpting with the Perrys being the nicest anatomically, Artizan the most dynamic and GB plastics being nice, crisp, plastic sprue infantry.

The above manufacturers will be the bulk of what I will use with the variation and kit bashing possibilities meaning the GB plastic Arabs will form the bulk of the troops, suitably green-stuffed with face veils to give them more of an Almoravid look.


Other manufacturers –
Eureka Miniatures – Sometime after I had purchased my GB plastic figures I discovered that Eureka have a very nice range of metal Almoravids. They have spearmen and archers in a variety of poses and are pretty nice. They are on the smaller size and mix rather well with the GB metals, being just a touch smaller than the GB plastics. For Skirmish games the spearmen lack a bit of pose variation, though the archers are fine in this regard. In massed units the spearmen pose is fine. I have a unit and they are nice figures...worth getting for some variation. I believe the owner is looking to expand this line so it is one to watch.


Black Tree Design - they do some nice figures in their Muslim Warriors range, which are on the slightly larger, but compatible size, with the GB plastics. They do a nice crossbow arab archer pack (the only one AFAIK) and picking bits and pieces out of the range will give extra variety. There are some nice medieval character packs that make excellent figures for skirmish games. The camel warrior range is the most comprehensive out there and quite nice, though I haven’t got many as they were used in limited (if any) numbers in Spain. BTD often have good sales and there range has many gems in it so I shall be picking the 'eye teeth' out this range for added variation. A back issue of Wargames, Soldiers and Strategy 'El Cid special' had many beautifully painted examples of BTD Muslims warriors and is worth tracking down for the article and pics.


Warlord Games – not much I could find though their Roman Camel warrior is very nice and will probably make its way into my force (converted) as the only camel unit (simply because it looks good!).


Fireforge Games – sadly they do not make any Arab cavalry types yet but their Military Order knights will be used for the later period military order troops for a Christian Army. The figures are very dynamic (maybe a bit too much) but overall they will work well, particularly for the later period 13th century stuff, not so much the El Cid period, which has troops more typically Norman-esque in style.

…I'm sure there are other figures out there around the First Crusade period but those above are the bulk of what I'll be looking to use for the period under consideration. One thing worth mentioning is that alot the above figures suitably painted and based will blend together in the same or opposing army...no question. You just need to be a bit careful when mixing within units if such things catch your eye.  For El Cid era collectors, there is a lot of good quality stuff to choose from.

So the plan is to use the Gripping Beast plastics for the bulk of the foot troops and the Perry Miniatures for the cavalry, all the rest for the tricky bits...


..next post we will look at some conversion work on the Gripping Beast plastic figures to take them from Saracen types to Berber types....