
 Following on from
the previous game we tried another scenario – this one involving a Sweep
operation so typical of the Rhodesian War. This one invariably involves the
Security Force player as the aggressor but I suspect it could be used
in a hypothetical setting with more conventional forces against some adhoc
Rhodesian elements, perhaps a Guard Force caught away from their protected
village or a late war game involving FRELIMO forces from Mozambique pushing
into Rhodesia itself or perhaps trying to throw back a Rhodesian external
operation.
Following on from
the previous game we tried another scenario – this one involving a Sweep
operation so typical of the Rhodesian War. This one invariably involves the
Security Force player as the aggressor but I suspect it could be used
in a hypothetical setting with more conventional forces against some adhoc
Rhodesian elements, perhaps a Guard Force caught away from their protected
village or a late war game involving FRELIMO forces from Mozambique pushing
into Rhodesia itself or perhaps trying to throw back a Rhodesian external
operation.
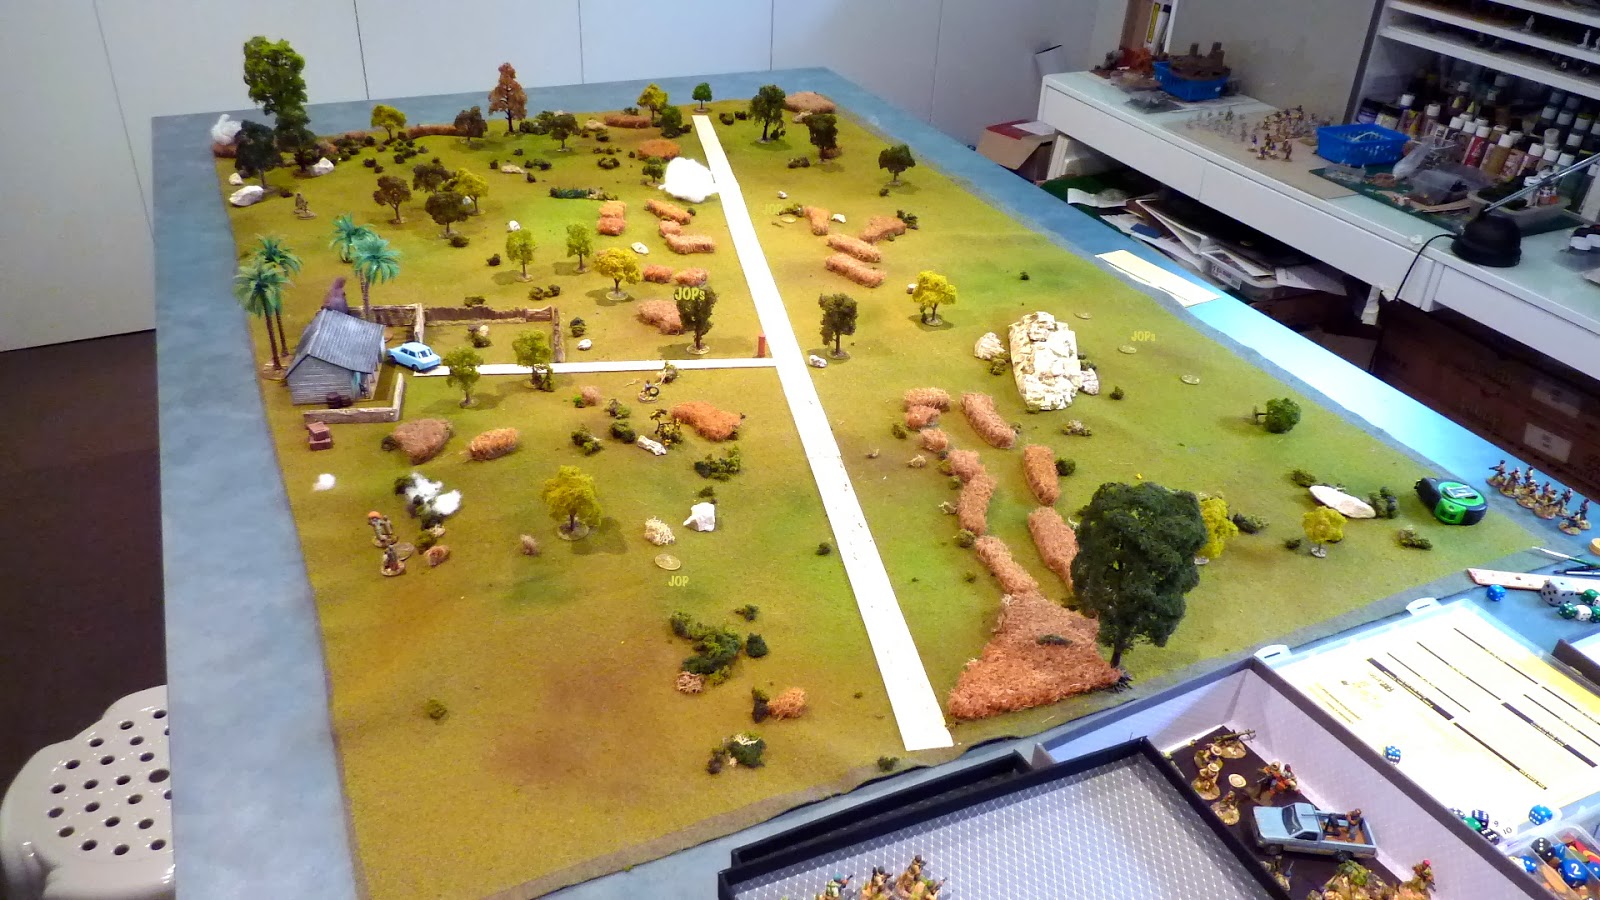
..anyway, this one
is a typical set up with Security Force elements vs insurgents who are on a border crossing raid - it is in the style of a Fireforce type action but does not directly represent it. The insurgents have been cornered and are now being swept to the Stop lines placed to the rear of the table (which is not
represented)....a classic cordon and sweep operation.
Note – whilst
Fireforce engagement are typical of mid to late war clashes in the Bush War there
were many different and varied forces and engagement types happening on the Rhodesian side. The reason the Rhodesian
Light Infantry figures prominently in these AARs thus far is that I am ‘stress’ testing’ asymmetric
warfare concepts using Chain of Command.
This is best done by trying to get the most contrast between the forces engaged. That’s the reason for the RLI vs Guerrilla focus. If this works then using similar troop types such as Selous Scouts and ‘C Sqn’ SAS should be achievable as well, whilst more evenly matched troops such as ZIPRA vs BSAP (British South African Police) forces will give more ‘even’ force balance mixes and present new challenges for players as troop quality, force mix and support options vary.....current results are that Chain of Command suitably adjusted, does a very good job of asymmetric actions....
This is best done by trying to get the most contrast between the forces engaged. That’s the reason for the RLI vs Guerrilla focus. If this works then using similar troop types such as Selous Scouts and ‘C Sqn’ SAS should be achievable as well, whilst more evenly matched troops such as ZIPRA vs BSAP (British South African Police) forces will give more ‘even’ force balance mixes and present new challenges for players as troop quality, force mix and support options vary.....current results are that Chain of Command suitably adjusted, does a very good job of asymmetric actions....

Situation.
c 1977, following on from the previous Fireforce action in the
morning, 1 Commando was tasked with another action later in the day.
Deploying 2 Troop as a sweep force, they were to clear out the
insurgents before they could bombshell and slip away…pushing them up against
the stop line to the insurgents rear.
The PFR difference.
ZANLA Green; CD5 (-3)
RLI Regular;CD6 (+8)
PFR dif is +11 for ZANLA
Level Two insurgency = 4
Mujiba = 2
AK47 upgrade = 2
Deputy Leader = 1
RPD LMG (two) = 2
=11pts
Scenario Support dice rolled is; RLI=3, ZANLA=n/a
RLI with their 3 extra support points take;
K-Car = 3
Action:
The Insurgent commander was set to strike a further blow against the RLI
by selecting a level two insurgency. Hoping to inflict some damage and then
exit the field before the sweep closed in on his position. The RLI force, flown
in by Yellow 1, Yellow 2 and Yellow 3 aimed up for another action late that
afternoon. The exertions of the day had the RLI force morale at a relatively
low 8 (rolled a 1) whilst the local insurgent commander’s pep talk had lifted
the spirits of the men and gave them a force morale of 9 (rolled a 5).
…so encouraged, the insurgents patrolled aggressively and boxed in
the RLI before the encounter commenced. Despite roping in the support of the
local boys (Mujiba) they did not elicit any more intel on the RLI locations, given the speed with which the RLI deployed this seemed understandable.
The first encounter had the RLI pushing forward gingerly through the
scrub. The ground was entirely covered with brush and trees with only the road
bisecting the centre of the field being truly open ground. This would limit
small arms fire to close range, the optimum for the AK-47 armed guerrillas…so
typical of this part of Rhodesia.


...pushing on, the first guerrillas were encountered. Rising from
the ground the ZANLA men fired a burst with their AKs fair into the Rhodies.
Taking a couple of shock they were largely unhurt by this opening exchange of
poorly aimed fire…so typical of spray and pray shooters. This triggered an
immediate reaction from the Stick commander…”contact, contact, contact!”….the
call went over the radio net….keenly picked up by the Fireforce troop commander
in K-Car 2.
…on the ground, the Stick hit the dirt and commenced firing…. the
MAG LMG barked out short burst after short burst, but the guerrillas only took a modest
number of hits despite all the noise…
….shortly after a lull in the firing, the distinctive ‘wocka, wocka”
of rotors could be heard approaching. Not sure if they were inbound for their
location the guerrillas stuck to their positions and hoped to do as much damage
as possible before withdrawing, their job done…


….unfortunately the ominous silhouette of the Rhodesian killer bee
K-Car could be seen in the sky above…in short order it located the guerrilla
squad located to the front of Stick 1, who called in the contact….
…with its distinctive 'thump, thump', the deadly firing of the 20mm
cannon rained down fire on the guerrillas, calibrated with lethal precision,
several rounds landing close enough to kill 2-3 insurgents and riddle them the rest with
shock…..as quick as it had come, it was gone, obviously low on
ammo or responding to another call it flew away (end of Turn). The guerrillas, realising they
needed to move off or be annihilated, ran back to a safer location and broke
contact with Stick 1 to their front…. for the moment they got a
reprieve…almost…..


…a follow on back to back phase saw the Rhodie Stick 1 inflict
further damage to the guerrillas causing them to become pinned as it now appeared
certain things would end badly at the rate they were taking fire..
..all this attention had slowed the left had sweep sticks, 1 and 2,
and enabled the right hand flank guerrillas to start to put some fire, mostly
nuisance, into stick 3. For the most part it didn’t amount to much as it seemed
obvious the push was on the insurgent' s left wing..supported by their gunship.
..the Stick 1 leader, his blood up, seeing the confusion the
insurgents were in, decided to charge the enemy position! Even though weakened
and pinned, the veteran light infantrymen took a risk…combining the fire of their LMG and AKs the guerrillas fought the RLI stick to a draw, but it was too
much, with excess shock, they broke.


…after this fierce engagement…and with the K-Car not being in the
vicinity having left the immediate area, the insurgent commander seized his
chance. Deploying two further squads into the fight to bolster his left flank
he planned to draw the Rhodie into his own ambush…it worked. Firing furiously
the guerrillas caused much consternation to the recently victorious but tired
Rhodesian Stick. It was too much. Taking excess shock and two casualty hits the
Rhodies broke and ran back into the scrub from whence they came.
…the medic tended to the wounded immediately, half the stick having
been wounded, the Stick commander only lightly wounded, as was the other
riflemen..all very lucky..minor wounds all round. They were good to go after a
short pause (phase) but having received so much shock they were rattled by
their ordeal and for now, out of the fight….
..at this moment the ZANLA commander really pushed his advantage.
Ending the Turn he now planned on getting away, thinking he had done enough. He
moved one unit back toward his dispersal point and other on his right flank.
The Rhodie stick, thoroughly shaken by the hail of fire they had received
retired well back out of the fight (removed from play) causing the RLI morale,
already low to start with, to teeter at 1 force morale point above the victory
level need by the insurgent play.


…for the moment it looked like an easy ZANLA win…despite the terror caused by the K-Car foray earlier on. With a broken RLI Stick and only one
friendly unit lost and the others preparing to get away..mission accomplished!
…off course things changed….and fast…..
…getting not one, not two or three, but four back to back phases
strung together, the RLI went hard. The K-Car now replenished. returned to the action and immediately set to brassing up the now ‘in the open’ ZANLA
guerrillas….
…..It was an awesome display of vertical envelopment….swooping
across the field, the RLI Fireforce commander, high above the action, commanded
the RLI sticks to move forward and engage the insurgents.


…at the same time he instructed the Tech Gunner on the cannon to
fire into all the ZANLA squads he could now see. In a matter of a few minutes
the battlespace had changed completely. The insurgents, so close to slipping
away having done the damage they had come to do, were now caught like
wildebeests on the veldt…with no where to run they took more than they, or
anyone, could take. Too fresh units broke and ran, one subsequently gunned down
to a man….
…shortly after the K-Car, its work done, flew off once again
(another end of turn).

…after a short pause, recovering from the shock of the previous aerial onslaught, the ZANLA leader positioned himself with the last squad in his command….however it was obvious now the battle was lost. In the dying moments of the action the remain two RLI sticks, cautiously advanced toward the last insurgent forces, mindful not to take any casualties to avoid an ‘own goal’ and allow the ZANLA guerrillas to claim a draw, placed themselves on Overwatch and awaited for their support to fly in...
… just as the two remaining sticks were in position the Killer Bee
arrived once again and firing its cannon, like a deadly sting, eliminated the
last of the guerrilla force on the field…
…and emphatic victory for the RLI, one they were so close to losing,
at least in the eyes of the insurgents, who had come very close to victory who
no doubt would be back for more…...

OBSERVATIONS
K-Cars live up to their name and reputation! They are indeed a
lethal means of delivering firepower. We discussed whether they were too
powerful but given that they can come and go, are reasonably vulnerable to
enemy AA fire and that the leaders onboard need to activated, not to mention
their loss having a morale effect…we felt overall the balance was about right.
They should dominate against poorly armed terrs that they catch. The Insurgent
player will really need to think on his force mix to counter the K-Car and his
insurgency level to achieve his objectives.
If he takes heavier equipment then it can have the dual role of forming
a base of fire on the ground and taking on the aerial enemy should it arrive. Alternatively
he can go to ground and reduce the effect of fire but this will hand the
movement initiative to the RLI stick in the Security Force player’s hands…all
sounding a bit historical really. We’re still pondering whether to tone down
the K-Cars a bit but overall they do much as they did historically which is the
name of the game…so it close to being right.
The insurgent player needs to mindful of his exfil locations and not
get to far away from them. In this game a unit was but 1” away from their
dispersal point which caused the Insurgent player to hold off ending the turn so
he could get his requisite two units to Gap It…that small delay resulted in the
return of the K-Car which literally snatched victory from the Insurgent player’s
hands…..they didn’t even have a chance to Bombshell so swift was the aerial
assault….
Some more refinement of the COIN concepts for the insurgents point of
view and how the Security Force player interacts with them are to be
refined but overall the outcomes are
pretty good…..
Here is a small article on a Rhodesian Light Infantry operation in Mozambique...

Here is a small article on a Rhodesian Light Infantry operation in Mozambique...


