Sunday, January 24, 2016

...the Last Post

For those that follow A Grag Bag of Games I'm happy to inform your that this is the last post.


I've moved!

Please follow the link to a newer look Grab Bag of Games.

A request to followers - for some reason moving from Blogger to Wordpress does not transfer the existing followers from one blog to the other. Could I ask that you click the 'follow' tab on the new wordpress platform to enable me to transfer followers from this blog to the updated blog - thank you.


Saturday, January 9, 2016

Death in the Dark Continent


It may seem strange to review a set of rules that has been out for well over 6 years. In particular it seems even stranger that a ‘popular' period with its most prolific author delivering his most mature rule set on the subject, should have such a relatively low profile on the internet when it comes to getting under the hood of the game. Chris Peers’ Death in the Dark Continent are the rules in question and with that in mind I thought I’d share an AAR and a few thoughts that amount to a sort of review of aspects of the rules, which I believe, is to see a new lease of life in a second edition release this year by Northstar Miniatures.

This was my first try of DitDC, a game played by many others over the past few years. A long time aficionado of the Darkest Africa genre just so happened to be a good friend and so he was very well placed to lead me though this initial look at an action in the Congo in the early 1890s. For those not familiar with Mac’s Little Friends it is worth having a sniff around his blog. In particular his AAR of his first go at DitDC seems to be a very popular post he tells me forming the best overview of the game I could find…I hope to add to that a bit with this post.

Note - all figures and terrain are Mac's...and lovely they are too...lucky am I to use such a great layout for my first Darkest Africa game. So, onto the game and some thoughts afterwards.

SETTING
Belgian Congo, The Arab War 1893. A small outpost, staging point, for up river operations that has come to the attention of some Arab Slave traders who have enlisted the help of a sympathetic Ngoni tribe, who have supplied some warriors for this potentially lucrative raid. The trading post has formed the way station for a number of punitive attacks by the Force Publique garrison, who have interdicted Arab slave caravans who have taken to poaching the local population from the surrounding villages. 


The Belgium force commander, Capitan Marcheur, has mustered his forces upon hearing the news of an Arab force approaching the small village. Sending forward two fast moving peletons of Force Publique askaris, he hopes to be able to hold off the Arab poachers before he can secure the position with the rest of his force.


Raid scenario - Death in the Dark Continent


FORCES

ARAB & SWAHILI 
- Arab Leader: Outstanding, Elite Skirmisher x1
- Arab nobles: Elite Skirmisher x1 unit @ 4 bases
- Swahili “wangwana” freemen or armed slaves: Untrained Skirmishers x3 units @ 4 bases

Ngoni allies
- Senior regiments: Elite Warriors x1 unit @ 4 bases
- Junior regiments: Warriors x3 units @ 4 bases
- Assimilated local tribesmen and other “donkeys in the skins of lions”: Raw Warriors x1 unit @ 4 bases

FORCE PUBLIQUE
- Leader: Soldiers x1
- Hausa, Zanzibari and other volunteer askaris: Soldiers with breech-loaders x3 units @ 4 bases
- Conscript askaris: Raw Soldiers with muskets x1 unit @ 4 bases
- Medium rifled field gun x1 unit @ 1 base


OPENING MOVES
The scenario called for a set up which allowed for 225pts of the attacker's (Arab) force to be deployed at game start (75% of the defender's total force). The Arabs could come on via a selected base edge and up to half way in on either side of it. In addition both players were able to place one unit in ambush. 

Taking advantage of this the Arab Slavers deployed their fast moving Skirmishers on their (long) table edge near the stream and sent their Ngoni allies on a flank march to sweep in behind the Force Publique position. Hoping to catch the weak Belgian force in a vice, if lucky, they would sweep into the village and complete their objective.

The Belgians had only two units to deploy initially…not alot! One was placed in ambush such that the only blue coats that presented themselves on-table were a lone platoon in front of the somewhat nervous local villagers. In the Raid scenario the defender’s reinforcements would not be available until turn 4…a long wait given the speed of the opposing warrior and skirmisher force…a raiding force par excellence in fact.

In the initial moves the arab skirmishers advanced quickly, realising that making for the village as soon as possible in concert with the Ngoni warriors presented a good opportunity to hit the village before the rest of the Force Publique arrived. Rolling quite well for movement (2d6”+2) they made good time, as did the Ngoni tribesmen, who up to this point didn't have any opposition before them.


Capitan Marcheur, seeing the danger, perhaps a little too late, then called for his askaris to break cover from their ambush position but not before the Ngoni warriors stormed ahead in an effort to drive them from the wood from which they emerged.


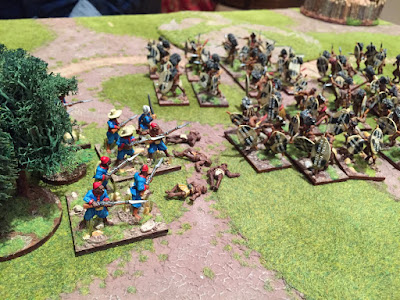
The Ngoni, their Junior units in the lead, raw troops in the second line and elite senior warriors in the rear, charged headlong into the Belgian forces hoping to drive them away with one vigorous attack. 

In an instant the forces were locked in combat and no chance existed for any long range fire from the askaris...it seemed that the shear weight of numbers would seal the askari's fate with barely a shot fired.


Nevertheless, in DitDC, charging breechloader armed troops head on with troops ready to 'receive' can be a very dicey proposition (as last second - and deadly - shooting is factored into the combat). In a crushing close range volley (good close combat modifiers) the askaris were able to inflict a punishing loss on the rash Ngoni warriors…Defender Holds!…the Ngonis had to fall back and lose a base for their efforts. In the subsequent morale test they failed their morale roll for the base lost and another for being ambushed so accruing four disorders (two for each morale failure)..not good…5 disorders sees them routed.


With the beginning of the next turn the Ngoni junior warriors were forced to fall directly back back into the rear support unit essentially pinning them between a rock and (askari) hard place. 

Meanwhile on the opposite side of the wood, near the stream and village, it all went quiet for a while as the arab force slowly moved forward and a desultory fire opened up with the lone Belgian askari unit, causing some disorder in the arab ranks, which was soon attended to by the presence of their Outstanding leader nearby. 


By turn 3 the lone askari platoon in the woods had successfully seen of the first Ngoni attack and was rather pleased with itself. This wasn't to last for long however. The shattered first unit withdrew off to the side and cleared the way for the next to surge ahead and try their luck. This time the Ngoni warriors would play smart and push up support to attack the askari in front and flank..a much more deadly combination.


Pushing on, the Ngoni right side units moved forward a little slowly but fast enough to contact the askari meaning both front and flank would be under attack vs the breech loading askaris (you can see the unit in contact in this pic…flank unit about to move up).


A brisk combat ensured and even though the askari were in good shape to receive another attack this time the Ngoni hit hard as both front and flank attacks seriously undermined the askari’s ability to resist. The final modified combat score resulted in a better, but still costly, outcome for the warriors, with the lead front unit taking a base loss (with a less than spirited attack rolling a 1) but the flank unit crashed into the blue coats forcing them to retreat and take a base loss with an extra one for fighting warriors….all those nasty pointy things! 


With that the Belgian askaris would be unable to hold their position however they had inflicted serious casualties on two enemy Ngoni warrior units…certainly giving a good account off themselves…or should that be the Albini breech loading rifle! 


Whilst all the action was happening in the ‘east wood’ the Force Publique rolled for their late arrivals. Being a Disciplined force they needed a 4+ to succeed and so it was that the two remaining askari platoons arrived along with the field gun (just off the bottom of the picture behind the Ngoni). 

Near the stream close to the village the second askari platoon arrived preparing to ford the stream and push on to secure the village and interdict the arab troops pushing forward through the grass reeds and east wood position. Now it became apparent that time was running a bit short for the defenders as the arab ambush unit, Elite Askaris, emerged from their position and moved toward the village…the net was closing.

Meanwhile, the determined askari defenders of East Wood fell back which resulted in them move into contact with an arab unit that by this time had been pushing up and positioning itself near the lone askari defender of the village. Effective musket range is prohibitively short in DitDC (4”) and even now the arab musketmen couldn't bring any fire to bear on the Force Publique troops. 

It wasn’t all bad news for Capitan Marcheur however, as the previously charging front Ngoni unit failed two morale tests which resulted in the unit routing as it had by this time accumulated 5 or more disorders…


With the start of the 5th turn things really started hotting up. Capitan Marcheur moved up to offer some support to his lone askari unit whilst his flanking forces slowly marched toward the centre of the battlefield. 

The arab and askari unit in the east wood were locked in combat and the Ngoni pressed on toward the village. The arab slaver unit pushed on to try and get some musket fire going on the askari unit to their front (defending the village) whilst the elite arab unit slowly moved out of the reeds near the stream at a rather slow pace. In the subsequent combat the rather plucky Belgian askaris in the wood fell back taking a couple of disorders..but was still in the fight. The much disordered lone Ngoni unit caught its breath with no rally tests being passed but for now at least safe from enemy fire.


Ngoni warriors push forward whilst the still battling askaris hunker down in the woods disordered 

In the 6th turn a hot fire broke out in front of the village. The askaris, despite the better weapons, lost their nerve and failed to inflict any damage whilst receiving some close range ‘buckshot’ fire from the arab musketmen, losing a base in the process and subsequently failing to pass their morale test despite Marcheur’s presence, giving them two disorders.


Realising that he was about to be overrun, Capitan Marcheur ordered his askaris to fall back to the village to prepare a last ditch defence. His flanking forces had been dismally slow in getting on table, this mostly due to the rapid movement of the Ngoni warriors cutting off any decent line of advance from their own base edge (i.e. they had been forced to go the long way around and use the flanks to arrive).


With things starting to look a bit desperate the askaris prepare to make something of a last stand. To the left a unit of arab slavers charged into contact whilst to the front a unit of Ngoni unleashed themselves on the hapless servants of King Leopold. All to no avail..in one desperate struggle they lost all their bases and the Ngoni warriors burst into the village to sack the village and capture the baggage train and helpless villagers...


…it is believed this final picture shot was taken just before Capitan Marcheur put spur to 'donkey' and rode away to leave the villagers to their fate...


DEBRIEF
So, that was our first game of Death in the Dark Continent, at least for me. Taking about 30mins to set up and 2hrs 30mins to play…so a nice 3 hour time slot which more or less ticks the box for a game that can be played at the club in the evening or a lazy afternoon. It was fun!

The game is pitched at the small battle scale, so this is not a ‘skirmish’ game as such and focuses on a battle system, thus it has a different feel to the lower scale game of 'In The Heart of Africa' written by the same author. It is a unit based game, not a single figure based game. Basing is on a 60mm frontage but it really doesn’t matter what bases sizes you use as each base need only stay a minimum 2” (4" for skirmishers and a few others) from each other to remain in cohesion and so strict frontages mean little in practice. Fighting is unit to unit and if you spread out all you do is thin your line and therefore make a unit more vulnerable to attacks by multiple enemy forces - generally not good in DitDC. 

This very simply allows for all manner of ways to deal with troop concentration on the table top quite elegantly. In fact it is quite reasonable to play DitDC without using bases at all as long as you note that a certain number of figures (usually 3) counts as a base and the unit facing is maintained throughout play, which is usually the case anyway. We didn’t try this as you can see but others have and I think this is worth a go to make the game look a little more dioramic throughout play, certainly for two base wazungu (white men) units it is easy to manage. Chris goes into some detail on this in his introduction, spelling out his thoughts for DitDC and it is perhaps interesting to read to understand the focus of the game...

"The rules cover some of the same ground as my earlier set, "In the Heart of Africa", but this is by no means merely an updated version, and players are advised to approach it as a completely new set. "In the Heart of Africa” was basically a large scale skirmish set. using individually based and manoeuvred figures."Death In The Dark Continent" employs multiple-figure bases and other mechanisms which make it easier to control relatively large forces, so that bigger and more sophisticated native armies like the Zulus can now be better represented. It is perhaps closer to a mainstream colonial" game, but by retaining the focus on Africa, and on inter-tribal conflicts and small scale "bush wars", it is possible to cover the subject in unprecedented scope and detail. 

Nevertheless the command and control mechanisms are designed to represent personal leadership in fairly small or traditionally organised forces. rather than the sophisticated staff structures needed to handle brigades, divisions and corps. It is feasible to extend our scope to cover an engagement like Isandhlwana, where the regulars comprised approximately a battalion, but Adowa or Omdurman might still be considered somewhat beyond it. 

This need not, however, prevent us using popular armies like Mahdists, Ethiopians, Boers, or the Anglo-Egyptians in the Sudan. There were plenty of small-scale actions which can be re-fought, as well as hypothetical battles against smaller tribal enemies or exploring expeditions. The Second Boer War, however, was much more of a "white man's war" between European-style armies, and is really a subject for a different set of rules - which is one reason why the time span covered ends in 1899."

Interestingly the force construction allow for specific unit number limitations but not unit size limitations as each can be between 2-8 bases. I have seen some online murmuring about this idea as an 8 base unit can die just as quickly as a 2 base unit, the size of the unit not being relevant to its survivability. However this works quite well in practice as small units become vulnerable to being eliminated and they lack ‘punch’ as well as each army list only allows a certain number of units. 

So ‘cheaper’ units tend to be large anyway and ‘costly’ units are more resilient and so will be smaller. When combined with the army force size for a typical game using the DitDC points system these combine to provide constraining parameters each in competition with one another presenting the player with a puzzle to solve in his force construction and subsequent deployment on table. in any randomly determined scenario. This way of creating units wouldn't work as well if it were not for the comprehensive army lists supplied that pulls the game together to make the complete game ‘system’ work.


Overall I was impressed by the relative ease with which the game played. There was nothing that we couldn't find in the rules or felt was missing (granted only a first play through). After a game or two your really would be across the rules pretty easily. The interesting sequence of play gets rid of a few problems of how fire and movement interact in other games which can create strange interactions. Essentially you do all your movement, alternating one unit at a time for each side, then once that is complete conduct fire simultaneously and then combat simultaneously. Morale comes after that and in the following turn, you make post combat moves. 

That’s a little different than normal and I think the post combat movement makes this easy as it is completed in the next turn which avoids units moving immediately after combat that prevents multiple combats interfering with one another. The interesting 'sequencing' of units is part of the game play and adds a 'tactical' element to contend with.

Chris explains the reason for this in his introduction and I think he makes a good case for conducting the sequence this way. In addition it had a feeling of doing something a bit different and the way units contacted, fired and fought made the game interesting. He says..

"Like their historical prototypes, our warbands and expeditionary forces are divided into units led by junior chiefs or officers. There are many differing views about how to represent command and control, but in "Death In The Dark Continent" the mechanisms for commanding an army are largely stylised, just as other aspects of the game traditionally are. In most situations there is no need for written orders or any other paperwork, and mechanisms like the randomised move distances take care of a lot of the minor problems with transmission of commands, subordinates' abilities, etc. which would otherwise have to be laboriously adjudicated with the aid of dice and charts. In some scenarios you will need to make a note of things like when and where late arrivals are to enter the table, but this has been made as painless as possible. 

After all, a system of written orders is not very appropriate for a period in which few commanders were literate, and even those who were would usually be able to control their forces by verbal commands. Far from reducing "realism", this system actually enhances the game by speeding it up and allowing tactical situations to develop. In a game in which movement is not strictly prescribed by orders, the main source of problems is likely to be interactions of the "if you do that, then I'll do this" sort. The alternate movement system used in these rules is designed to prevent this, while also avoiding the odd situations which sometimes arise if one entire force has to move before the other. It also reflects the fact that most battles take the form of bursts of action and reaction interrupted by pauses, rather than continuous frenetic activity. You will get the best out of this system if you do not try to think of all movement as simultaneous, but use your tactical skill to decide which of your side's units need to move early in the sequence, and which should wait to see what your opponent does. 


Another potential source of difficulties is the question of reacting to events which the player is aware of but which the figures on the table would not be able to see. Players can easily find themselves in the situation of pretending not to know what everyone can see which is frustrating from a gaming point of view and can lead to disputes. So we assume that the general location of all on-table troops - except those hidden in ambush - is either at least partly visible to the fighting men (they are. after all, likely to be shouting war-cries. firing off muskets. or otherwise advertising their presence), or has been communicated to them by their leaders or scouts. Therefore a unit can legitimately be manoeuvred in response to an enemy even if it has no direct line of sight to him." 

…it can be seen that he has clearly given this a good deal of thought and the game plays out much as he describes and it is the better for it.


Shooting is conducted using a D20 which provides a good deal of granularity for all the weapon types covered in this period of warfare. Ranging from spears to repeating rifles, Maxim and rifled and smoothbore field guns the shooting mechanism, if a little factor heavy, provides some nice texture to this part of play. 


Close combat is decisive. The combat factors include the defensive benefits of firearm weapons which removes all sorts of strange ‘gotcha’ moments from unusual sequence of play movement…if you charge a unit of firearm infantry then it is going to hurt no matter what..even if you charge from the flank or rear (reflecting last minute responses to attacks and so on)….thus close range fire is always assumed to occur. As a result softening up an opponent by disordering him or seeking a tactical advantage is a very good idea to reduce the effect to defender ‘combat fire’ (added as a close combat factor) or taking a front and flank simultaneously. 

Combat is resolved very simply with a D6 roll by the attacker only which really can mean that a -2 or -3 modifier will significantly reduce their chance of success, but not in an immediate sense. The worse an attacker can suffer is to take disorder and fall back with base loses…not great but it doesn’t result in a unit being destroyed.  The defender however can be swept away by an attacker with a good die roll result.

You need to stack combat factors in your favour or you’d be better of not charging at all…study these combat factors for a bit, it’ll pay dividends in the heat of the moment! Weapons for defenders are also assumed to be used in 'locked' combats so if you have breechloader or repeaters armed troops this firepower is really important in melee when trying to see off the hordes! A headlong charge into the face of modern weapons will likely result in a unit being combat ineffective through accumulated disorders. 

The subsequent morale test however can cause a failed attacking unit to break…so in this way units more often than not ‘die’ from morale loss not through immediate combat effects unless overrun in an attack. I like this, with morale being ‘king’ when it comes to how survivable units are in an assault. This means the quality and leadership of the forces involved are paramount in this equation and the full sweep of armies provided in the game offer a rich landscape of army and troop types that play to this strength of the rules.

Morale is very important. A unit that fails a morale test gains two disorders which reduces their firepower. A second failed test producing 4 disorders stops units from advancing and with only one extra disorder a unit routs. Now given that a unit rolls 2D6 (raw 1D6) needing a 6 to rally off disorders, the accumulation of disorder is very nasty and the only real way to more effectively reduce morale is have a good leader nearby. Some factors also allow units to ignore tests such as the presence of a leader, behind defences or being special unit like a chief or wazungu. 

However the accumulation of disorder morale effects generally seems faster than you can get it off. This appeared a little strange but usually means that, on balance. when things start going badly then it is harder for things to recover effectively or in time…a definite consideration when putting a unit in harm's way…often though unavoidable that it might be. In addition there are multiple causes for morale tests and for typical troops a 50/50 chance of passing, with raw troops being a 1 in 3 chance only. Raw troops will be punished severely by their inability to both pass a morale test and then remove morale markers. ...stick 'em behind defences and have a leader nearby would be best!

Overall this inability to easily reduce morale probably gives an historical feel and within the constraints of the scenario format is likely appropriate. If players feel that morale is to punishing it would be easy enough to allow a morale recovery on 5 or 6 or the roll of an extra dice when testing…either one would make the ‘morale slide’ a little less dramatic…this would be a point to consider if morale seems to 'brutal'...this would be an easy tweak to add. For now we’ll stick with Chris’ judgment on this and run with the rather harsh treatment of units suffering the effects of morale loss, but any perceived injustice on this won't take much to fix.


Turning now to the game as a ‘package', I think this is where DitDC shines. Chris is clearly the guru on this topic and his passion for the subject kind of oozes out of the pages. This feels like Darkest Africa, not a version of another game with a couple of bolt on additions. The comprehensive description of troops types, the role of leaders, detailed terrain effects and the importance of baggage as well as many other period specific rules makes DitDC a game that has depth. 


Even though the rules themselves are relatively simple the comprehensive army lists that detail an army's organisational ability and aggressiveness go directly toward affecting how a player would think about using his force i.e. putting his army together. The supplemental army lists, 80 in total, go beyond those in the main rule book (both of which are compatible) providing players with a detailed treatment of the armies of Africa of this time. ..excellent stuff.

These rules do not serve up 'samey' one trick armies…there is alot of variation and numerous specific rules that give each army a unique character. The army lists give players a clear indication of the vast number of forces involved in the period and Chris is to be congratulated on producing this supporting document. They also include army specific rules thus making the standard game quite 'clean' but still accounting for all those small nuances that make one African army different from others…10 out of 10 on this front.

However, before getting to carried away, if there is one possible weakness of the rules it is how the scenarios are presented. They are difficult to interpret easily and need work in any subsequent edition IMHO, which hopefully we shall see this year (2016). I hope this part of the rules receives some attention - simple diagrams to show deployment areas and ‘dot point’ descriptions of set up will help no end and save alot of time and confusion…take note Northstar..please! 

That said, the scenarios themselves are interesting and speak to the period and so getting these tightened up will improve the final product immeasurably IMHO. It’d be interesting to make additional scenarios available which would further add to the versatility of the game. I'd suggest Northstar focus a bit on this aspect of the game and rope in play testers to stress test this side of the game a bit.


Also, there are some subtle rules that also can have a big impact depending on the scenario you play. For example, if you have a field gun then you cannot fire in a turn, or previous turn, in which you move. So that means in an 8 turn game you have lost two turns of fire whenever you move….so if defending this will have less of an impact but if attacking then you need to set up a field of fire ASAP or your guns will usually be dragged around all game for no great advantage...not an ideal outcome from a randomly determined scenario set up.

As an idea, because of the importance of the scenario you play and the force structure you take I think if you have an Outstanding general, which costs a fair bit in the game, an idea that allowed him an ability to use a +/-1 modifier to the random die roll for scenario selection, or perhaps a re roll, would be worth thinking about. This would add a bit more depth to the setup and preparation side of play and adds a nice touch to those armies able to use leaders of this type (not all can).


Lastly, the play sheet on the back of the book is adequate, not great, it not having enough details for my poor old brain…so I did up a version of a play sheet that will probably prove useful as it more or less has the game on the two sided sheet limiting or eliminating the need for rules reference. 

So in summation, I think Death in the Dark Continent is a very good period specific set of rules that moves along at a nice pace and provides depth for organising, modelling and presenting armies of the period in an historical fashion. It'd provide an excellent vehicle for use in a campaign setting.

Highly recommended and even though they are unavailable at present from Northstar you may be able to pick up a copy at a retailer or just wait for the next version to come out…hopefully sooner rather than later. This game deserves a bit more attention than it gets...