

In this instalment we look at a bush war scenario that was very
common - an attack on an isolated farmer's home or villager's kraal, police station, or military
outpost, be it in Rhodesia or a neighbouring frontline state such as
Mozambique, Zambia or Botswana.
The thrust behind this scenario is the attacking player must
decide on the 'weight' of his attack against the outpost and whether he wishes to
make that the main target or simply use it as 'bait' for the relieving defending
forces that enter the table. If an attacker chooses to emphasise an assault
against the building and it's inhabitants as his sole objective then whilst the
target might be harder to 'destroy' it enables him to concentrate and tailor his
force for that task. Conversely he can set up a quasi-ambush along the access
road to the outpost as well and position his troops cross country to interdict any enemy
attempting to relieve the outpost.
As the defender can enter via the road or through the nearby bush
land or a combination of both, the attacker will have to plan for a range of
contingencies and pre battle objectives and possible switch lines to counter
this response...not just an attack. As part of his plan he must allow for paths
of egress for his troops as well, which if he is unable to get to will result in
his capture or worse.
The defender must hold out in the outpost and hope the attacker
cannot achieve his objective before help arrives. A slow or unresponsive
counter punch can result in the attacker achieving his objectives and slipping
away, whereas a hasty and rapid assault could lead him into a planned
ambush...he will not know whether the outpost, or in fact the relief force, is
the main objective of the attacker....so must balance aggressiveness with
caution. If the defender is a Security Force (SF) platoon then he will also not be aware of the level of insurgency the Communist Terrorist (CT) player has selected...which will determine the willingness of his forces to hang around in the fight. It's worth noting that whilst this scenario is typical of the many Insurgent raids into Rhodesia it can
also be the basis for a raid by SF forces on overland operations into Frontline States which were conducted by many army units.
Scenario
In this scenario we pit a group of somewhat experienced ZANLA
insurgents attacking a local krall known to sympathise with Rhodesian forces. A
reacting body of Security Force army troops from the Rhodesian Regiment respond
to the attack, this all taking place during Operation Glamour,
circa May, 1967.
Forces - CT player
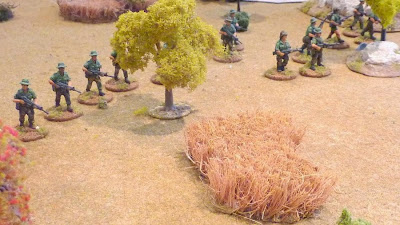
ZANLA Vakomana Fighters
Green: -7
Command Dice: 5
Command Dice: 5
PLATOON HEADQUARTERS
Commander (Superior Junior Leader) and Deputy Leader (Junior
Leader), both with PPSh.
There are two Sections per Platoon, each
SECTION
3 Guerrilla with PPSh
8 Guerrillas with SKS
Plus (PFR split is -7 to +2= 9). Scenario die roll for support
equals 6..total support list choices are 9+6=14.
4pts Level Two Insurgency
2pts Mine
2pts Replace one SKS sections with AK-47
2pts Replace all PPSh-41 in the force with AK-47
2pts Upgrade entire force as ‘Vakomana Shumba' (aggressive troops)
1pt Exchange one Guerrilla's SKS for a RPD LMG*
1pt Exchange one Guerilla's SKS for a RPG-2*
1pt Hand Grenades for one squad
These troops suffer the (historical) detriment of three traits
resulting in them being slow to act (low initiative), vulnerable in the open
(Garden Boys) with bad fire discipline (Bad Shots). On the up side they have
special rules allowing them to move very quickly (Tsuro) and redeploy
(Shumba).... They also have a reasonable split in the PFR to tailor their
force.
Forces - SF player
Royal Rhodesian Regiment
Regular: +2
Command Dice: 5
Command Dice: 5
PLATOON HEADQUARTERS
Lieutenant (Senior Leader) with SMG or Sergeant (Superior Junior
Leader) with L1A1, One radio operator with an L1A1, One trooper with an L1A1
There are two Sections per Platoon, each
SECTION HEADQUARTERS
Corporal (Junior Leader) with an L1A1, Two troopers with an L1A1,
one as medic
There are two Groups per Section, each
GUN GROUP
L/Cpl with L1A1, Gunner with an FN-MAG, Trooper with an L1A1
RIFLE GROUP
L/Cpl with L1A1, Gunner with an FN-MAG, Trooper with an L1A1
RIFLE GROUP
5 troopers with an L1A1
Plus
Scenario die roll for support equals 6..total support list
choices are;
2pts Truck to transport up to 20 men or tow a weapon x2 = 4pts
2pts Heavy Cover barricade
The Royal Rhodesian Regiment troops are your 'plain vanilla' Rhodesian
force. Nothing to outstanding to say, they have a Bush Doctor in their platoon
to help with any casualties but that's it! Their low PFR however will keep the
enemy force choices a little under control.
Force Morale Points at start...
CT player - 8
SF player - 8
Force Morale Points at start...
CT player - 8
SF player - 8
The patrol phase for this scenario is somewhat different to that conducted in a normal chain of command game. In this situation only the attacking player uses patrol markers, moving them as usual until he gets at or within 12" of the road or the farm. At this point, the opposing player starts rolling 2D6 each time a marker has finished moving and if the distance or beyond to the patrol marker is rolled on the dice then the marker is locked down...so the closer you get to these 'obstacles' the more likely you are to be locked down (reflecting cautious reconnaissance near areas of 'threat'). The 'patrol markers' are then converted to jump off points (JOPs) as they are shown in the pic....this is a unique sequence specific to this scenario as the attacker is the only 'active' player in the patrol phase...the defender doesn't patrol as such as in reality he doesn't really know he's there.
In this case the ZANLA player pushed his recon elements (JOPs) up the middle of the table from the side location (one of two he may choose from), in an effort to be able to deploy to cover the road approach as well as deploy near the kraal objective.
Battle!
The action opens up with the locals wandering out of their huts after hearing some rifle fire coming from the edge of the clearing in front of the kraal. With these captured prisoners the locals are a little tense as insurgents have been reported in the area...


Joost screams to the troopies to shoot and the MAG gunner opens up.... short, accurate burst result in three shock being placed on the guerrillas....somewhat foolishly they stand up and challenge the Rhodies to come at them....Vakomana fighters indeed!


Debrief
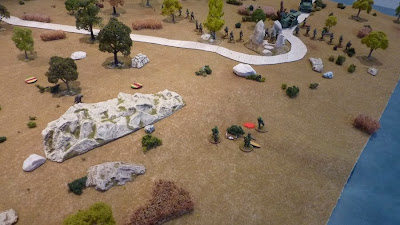
 |
| In this pic you can see the Defender (Rhodesian) reinforcement entry point and the Building objective or target for the insurgents to hit. |
Battle!
The action opens up with the locals wandering out of their huts after hearing some rifle fire coming from the edge of the clearing in front of the kraal. With these captured prisoners the locals are a little tense as insurgents have been reported in the area...
 |
| ...the Rhodesian Ridgeback can hear something...looks like the locals can see something too.... |
...and right they were! The insurgents generate three chain of command points on their first phase and elect not to deploy any troops but make enough noise as they move up such that their presence is announced!
...The Security Force, responding to a flare fired from the kraal, makes it appearance on the access road in the first truck which is carrying a section platoon sergeant and one section of infantry...
 |
| Note terrain is scattered about the entire table as 'light cover', barring the clearing near the kraal...limiting visibility but not movement. |
...out of the scrub they emerge, the first ZANLA squad. The guerrillas gaggle around their jump off location as they move to the edge of the clearing and attempt to strike straight at the kraal. It's a well planned approach that has them within striking distance of their target from the opening of the action...
 |
| Dice: (5,1,2,6,4) Note dispersal point at bottom of the pic...the three jerry cans. |
Racing out of the huts the villagers grab their rifles and take up position behind the heavy barricade they've built to protect them for just this situation. This should provide them with a good degree of cover from insurgent fire as well as some protection if they get attacked.
 |
| The barricade was a support list choice...almost mandatory in this scenario for the villagers |
A close up of the guerrillas shows that they have come equipped mostly with the venerable SKS rifle and an RPG. The leader, Josiah Akiki (hand waving), encourages his troops forward as the guerrillas shake themselves out....

A brisk fusilade opens up. The rifle fire is largely ineffective as the three villagers man the defences. The locals have fired off another flare to hurry the local constabulary along.....not realising they are already on the way. For now its three against many!

Knowing that time is critical, Josiah calls on his RPG gunner to fire at the main kraal building, the objective for this mission. The weapon is primed and ready to fire....

...meanwhile two trucks are heading up the access road. Lucky for villagers elements of the Royal Rhodesian Regiment is stationed nearby and they make good time to get to the threatened kraal. Time is a factor for the Rhodies as they too want to engage the insurgents before they slip away...they pick up the pace mindful that the road could be mined as has happened in the past...
 |
..the first RPG round is fired. It misses!....but only just, passing just over the top of the hut, doing no damage. The rifle fire continues with little effect to either side...

...still more sporadic fire. Not really expecting to be able to do much damage, they're hoping they might get lucky and drive off the villagers so the RPG gunner can move in and get a good shot at the chief's hut. Good news however, as they score a double six on their command dice die roll and get back to back phases...

...knowing his squad is safe for the moment, Akiki keeps up the tempo....the RPG is primed again...."remember your training!" shouts Josiah......"make ready....fire!!!"

..this time the RPG whistles by and passes through the roof of the hut much to the delight of the comrades in the squad....The hit causes the SF morale to drop by two points as bits of the building fly off from the exploding RPG round, the villagers running for cover....getting the hang of it the young lion reaches for another grenade and prepares his weapon again....
 |
| Any RPG hit on the building potentially causes the SF force morale to drop. In this case the 'strike' has a good result dropping the SF force morale from 8 to 6...which was quite a good outcome. |
...however, with a poor roll of command dice the second time round the insurgent player loses his chance to inflict some more damage and possibly achieve his objective in the easily stages of the action...he does instruct the troops to "spread out" using their special 'Tsuro' move which enables them to move 3D6" and not suffer any shock. All is ready for some deadly volley fire next phase....
 |
| The ability of the insurgents to Tsuro move is a powerful trait. This enable them to move around quite fast so the CT player must be careful not to get to much shock on his units or they will slow down and he'll lose this advantage. If a unit becomes pinned then of course it cannot move... |
...with all the activity and firing that the Rhodies can hear coming down the road the sergeant instructs the driver to speed up. He moves at a 'safe' fast speed (2D6") but unfortunately for them the insurgents have placed a mine on the road and it is not spotted....BOOM!
 |
| ...mines are triggered by the speed a vehicle moves. The faster it goes the more likely a mine is to explode and less likely it can be spotted and avoided. |
...with an almighty explosion the truck flips on its side. The force of the explosion, which must have been a piggy-backed mine by its intensity, sends the trucks sliding along the road. The Rhodies bail out, one man is down injured, the rest somewhat shellshocked but otherwise unharmed...needless to say the platoon lieutenant instructs his driver in the second truck to slow down!!
 |
| Mines are handled uniquely in Bush Wars:Rhodesia. They are not placed by the owning player but, as mentioned above, the speed of the travelling vehicle determines if the mine is detected or triggered. AP hits for mines are D3+3....in this case the CT player rolled a 6 causing 6AP hits. On an unarmoured truck each 3+ is a 'kill', the truck taking 4..ouch! This knocked out the vehicle and caused 2D6 casualties on the passengers and the CT player scored a 10!! Of these, some poor rolling caused no shock and only one casualty (Kill)....this could have been a disaster for the SF player! |
...at the sound of the explosion Josiah encourages his men as the Rhodies have for sure suffered from the mine he planted the previous night. His men, inspired by their leader's luck and success, pick up the fire on the kraal. Getting a double six on the command dice again and with the enemy reinforcements in disarray, he taps his RPG gunner on the head to fire again.....
 |
| Command Dice (6,6,3,3,1) |
...direct hit! The young gunner fires his last RPG round right into the hut which starts burning as the grenade explodes...an unmistakable roar goes up at the edge of the clearing, guns waving in the air, as the insurgents are bouyed by their success.
 |
| Josiah Akiki can be seen here, JSL (Junior Senior Leader). The second hit on the building causes a check to see if the force morale points drops...the insurgent player rolls a 6 causing a massive three point drop in force morale for the Security Force....their force morale has now dropped from 8 to 6 to 3 points!..this actually means the insurgent player has achieved his objective of reducing the enemy morale and may now think of getting away if he chooses to. |
 |
| ...a close up of the burning chief's hut.... |
...at the sound of the explosion, Jonathan T'Kongo, the commander of the second squad of insurgents, moves into position. Perfectly placed to interdict the advancing Rhodesian relief force the ZANLA plan is unfolding better than they had hoped....

T'Kongo, seeing the Rhodies in confusion orders his men to fire, but their poor weapons handling causes no hits though they sense they have the SF forces right where they wan't them.....
 |
| T'Kongo (pointing) is the junior leader (JL) of this squad. |
Springing into action, the young Rhodesian sergeant (Joost), a South African by birth, immediately gets his squad to shake out as his voice of experience steadies the men (removes shock) as he takes charge of the situation. At the same time he gets on the radio and reports to HQ that he has a man down injured. Fortunately the SF player rolled a double six giving him a back to back phase..
 |
| (Command Dice 6,6,5,4,3) |
Travelling in the rear truck the platoon Lieutenant, Jimmy Shale, starts barking out orders. Knowing Joost can handle his section, he instructs his section to debus and head into the scrub off to the right. Pushing the rifle group out furthest and advancing with the MAG gunner and small HQ group he hopes to lay down a platform of fire and swing around and take the insurgents in the flank.
Sergeant Joost, now having recovered from the shock of the mine explosion similarly pushes his rifle group out to the left and gets his gun-group to race into the small rocky outcrop and start firing on the insurgents.
The man down is still close by and can be attended to by the section medic (bush doctor).
 |
| Here you can see the typical layout of a Rhodesian platoon. Two section in this case, each with their separate rifle and gun group led by the platoon HQ element. |
....T'Kongo can see the Rhodies starting to move and steadies his men for the fight. Not any ordinary insurgents these Vakomana Shumba 'veterans' are up for a fight....or at least will not run at the first sign of the enemy!

....as Joost shakes out the left hand section, Shale pushes the right section up and gets on the blower, calling in to find out the whereabouts of the Casevac vehicle for the young oeun who is wounded. His condition is not yet stable and Shale doesn't want any dead men on this mission so takes a moment of pause to call up, give a quick sitrep and get the support vehicle moving...
 |
| ....The platoon shakes out before the sweep |
 |
| ..Sergeant Joost has his men in a skirmish line ready to take on the terr fighters.... |

 |
| ...the MAG gunner prepares to fire.... |
 |
| ...as do the young Vakomana fighters.... |
Joost screams to the troopies to shoot and the MAG gunner opens up.... short, accurate burst result in three shock being placed on the guerrillas....somewhat foolishly they stand up and challenge the Rhodies to come at them....Vakomana fighters indeed!

......the supporting rifle group also opens up and starts peppering away at the enemy.....killing one insurgent and inflicting another four shock...deadly suppressive fire...

....meanwhile the section under the platoon commander's personal direction moves off to the right, the battle line starting to take shape....

 |
| ....note, visibility is limited to 18" so the insurgents are just on the limit of being seen by the SF forces and vice versa.... |
...steeling his men to the fight, and to curb their enthusiasm somewhat, T'Kongo tries to move his men back away deeper into the scrub...he fails to get them to shift however due to the effects of the heavy suppressive fire from the enemy machine gun and rifle fire...
 |
Even though he and his men can (Tsuro) move very quickly the amount of shock his squad took (7) has resulted in him only falling back 2" (rolling 3,4,2).... not enough to move out of visibility range (18").
|
....still no sign of the Casevac vehicle, Joost gets on the radio again trying to find out what the delay is, as the young oeun starts to look decidedly shaky....

...."straight line boys, straight line...."

...meanwhile back at the kraal the villagers come out of the huts and peer over trying to locate the insurgent terrorists. Despite many pairs of eyes, they can't see anyone and the rifle fire has stopped.....


...on the edge of the scrub, Akiki gives the order..."home boys, home....lets go!!" The veteran commander that he is now knows the time to move has arrived. The Rhodie's can't be too far away as many minutes have passed since the land mine has exploded and he can also hear rifle fire to his rear and knows T'Kongo won't be able to stay in the fight long.....

"...Ok! one more shot, only one....lets go!!"

...with that, Akiki and his squad make a run for it!!! Heading toward their pre arranged dispersal point they make haste to slip away before the Rhodies can catch them in a trap...their early success has given them a great opportunity to 'take the gap'...


"come on lads, let's stick it to those terrs....grab that other ammo belt will ya, I'm runnin' low...."

...they're up on that hill, just over there...

 |
| ...as the first squad heads toward their dispersal point the second squad hangs tough with the full weight of the SF force to their front.... |
...T'Kongo, encourages his men to fire and the cacophony of miss directed shots goes harmlessly overhead the Rhodesians without causing any casualties, but it does have a suppression effect (causing two shock points)...
 |
| CT fire is notoriously inaccurate, as it was historically, but if they can cause only one or two casualties the Rhodies will be slowed down significantly as the loss of each man can reduce their force morale. |
"...there, watch out on the left, they're trying to get behind us...keep firing!....can you see them....those guys, over there"

 |
| ....as T'Kongo's squad holds the line Akiki's squad hurries along behind through the scrub... |

..."enda, enda, enda" (go,go,go)...


 |
| From this one round of deadly fire T'Kongo's squad took four kills and seven shock...more than would've normally been expected...it was clear now that T'kongo had over played his hand trying to cover the exfil of the first squad behind them. |

"...spread out, spread out..."

 |
| ..amazingly T'Kongo did not go down as a casualty in the last round of fire. With shock at 8 and five men left in the squad, it teeters on routing but now can't move because it is pinned. Fortunately the squad now counts as if in Hard Cover as the troops hit the dirt to protect themselves amongst the scrub....is it enough? Problem is they need to get away and now they can't move. |
 |
| ...the Rhodies are now ready to make their final push on the insurgents. The enemy has lost the ability to really cause them any further morale loss through fire and to break an insurgent unit will deny the CT player victory. |
..the right hand section sweeps forward...but where is the casevac vehicle??...the young one doesn't look to good...

...the ZANLA squad led by Akiki is close to their dispersal point so must test to see if the unit bombshells (scatters) or will hold its nerve and Take the Gap instead...if it bombshells the insurgent force morale will drop. Limited by a bad command dice roll he must choose between assigning dice to T'Kongo or use them himself...
 |
| ..in this phase the CT player got another 5 on the command dice nearly giving him a chain of command dice....amazingly after the initial three 5s in the opening phase he hasn't got another 5 (barr one) on his command dice since. However, on his next roll he also scored three 1s!! With this he decides to reduce shock on T'kongo's squad and forgo movement on Akiki squad altogether. |
...and with that, Akiki's squad Bombshells! He loses control of his men as they scatter in all directions...no question, seeds of doubt start fermenting in the men's minds as they near completion of their mission but can hear the deadly fire from the nearby Rhodesian forces...
 |
| ....Bombshell!!!... This causes the insurgent morale to drop...bomb-shelling being the equivalent of a Section breaking. The CT force morale drops from 8 to 6. |
"...run!!..."

 |
| ...The Rhodies got very lucky with their firing this phase!...T'kongo is wounded, causing a force morale die roll..scoring a 6!, resulting in a 2 point drop, from 6 to 4. However the Section breaks which also causes yet another die roll for force morale loss, it now dropping from 4 to 2!....things are looking shaky all of a sudden. |
...T'kongo and his men make a run for it, falling back into the scrub and heading directly back to their dispersal point (they rolled 15" for movement!)

...on the next phase the CT player must attempt to reduce his shock so that he does not remain in a routed condition. He could then play his Chain of Command dice, end the turn and with an activation, Take the Gap...so goes the plan....T'Kongo still has a few choices to get away even though he is running!

....what actually happens however, is the SF player immediately uses his Chain of Command dice to end the turn! He takes a chance as his own casualties still haven't been attended to which could result in a reduction of his own force morale, however he wants the CT player to lose the unit 'routed' off table. This will cause a force morale loss for the leader routing and prevent the CT player from recovering and being able to take the gap thereby avoiding any possible force morale loss as he gets both units away.
...so by forcing the issue the SF player declares his hand, the CT player rolls for the force morale loss of his leader (routing off table) and luckily rolls a1!...resulting in no force of morale loss. He then rolls for the routed unit, and as it is must now bombshell to get away, it too checks on the force moral table. A score of 2 means a drop of only 1 force morale point, result in the CT force morale dropping from 2 to 1....
...as both units of the CT player are off table, his force morale is not reduced to zero and the enemy force morale is three or less it's a ZANLA victory!!!.....Josiah Akiki gets both units away and slips into the scrub undetected by the Rhodie force.
Postscript
At the end of the game all casualties must test as if the turn ends. This can cause a reduction in force morale for the SF player so he needs to take that into consideration when he decides to try and end the game. In this case no further morale reduction occurred.

Debrief
The scenario played somewhat differently to that which was
anticipated. The CT player used his Patrol Phase well, positioning his
JOPs centrally to enable him to deploy straight into the action...which is
kind of the idea. He was a bit lucky as he caused so much damage with his RPG
attack which virtually meant he needn't have engaged the SF forces at all. This
would be termed the optimal outcome for the CT player in this scenario as he
can usually count on having to fight the SF forces up to a point to cause the
Rhodie’s force morale to drop.
Having achieved his objective he played smart and more or less tried
to withdraw and not engage the oncoming SF Forces. He could've swung his first
squad to support his second and try and get the enemy force morale to zero with
another success which would have delivered him victory also, but instead chose
to ‘Take the Gap’ (getaway) instead...ultimately a wise choice, though it
almost went wrong. As Akiki's squad was equipped with only SKS rifles they really didn't come equipped to take on a fresh Rhodesian platoon....which was never his plan anyway.
The mine is certainly an excellent option for the CT player in this
scenario and he could've ignored the building objective completely and
attempted a more deliberate ambush of sorts vs the SF relieving forces with the
way his JOPs were placed. To do so though might have meant it would've been
hard to break contact and make it to the dispersal points....in other words he
would've had to stand and fight to achieve his win. By selecting an Insurgency Level Two he never had the resources to do that, but the SF player couldn't have known this but ultimately his bluff would’ve been called.
In this case the CT player cleverly used a combination of attacking
the 'soft' target of the building and delaying the SF relief force with his
second squad, which proved to be the
right combination to pull off a victory and slip away, albeit with both squads bombshelling and causing a loss of force morale.
Tactically, T'Kongo would have been much better putting his troops in a tactical stance to minimise shock and casualties in the opening firefight, which would have made his job of slipping away much simpler...but he forgot in the heat of the action!
Tactically, T'Kongo would have been much better putting his troops in a tactical stance to minimise shock and casualties in the opening firefight, which would have made his job of slipping away much simpler...but he forgot in the heat of the action!
Fortunately the CT player had the luxury of high force
morale toward the end of the action due to virtually no losses which enabled him to 'burn' some of it as he
approached his dispersal points…it's always good to have some force morale left
as you approach your dispersal points as you never know if you can 'take the
gap' (which causes no force morale drop) or if you will bombshell (which
will cost you force morale)...which could lose you the game right at the death
when victory seems assured........this is always a potential problem for the CT
player and reflects that the battle is not fought in a vacuum but accounts for
the 'real escape' of a CT force before the SF forces can locate them in the
post battle pursuit.
For the SF player his engagement started by choosing some defensive
works for the defenders of the krall/farm. This is not mandatory but is useful.
Alternatively he could place his defenders in a tactical stance which
effectively makes them as hard to hit but they could be easily overrun and
their loss would be as damaging to force morale as the damage to the
building....so this is a real consideration for the SF player....he does not
want a repeat of the real life Altena Farm event so must guard against this.
The on table reinforcements were a bit unlucky in that they were not
really expecting to detonate a mine, on the contrary, they might have hoped to
spot it. Wheeled vehicles move fast down roads so can rapidly get to their
destination. As the SF player can see the enemy JOPs once play starts
(essentially reflecting a good platoon commander identifying potential ambush
locations) the tactic of moving slowly makes sense, which could potentially
mean seeing a mine, avoiding it, and then speeding up rapidly to move through
any likely ambush area and to the krall. If he's really lucky he might get a
back to back phase to move up quickly, however in this game, the CT player had
not yet used his 'free' ambush which would've enabled him to counter such a
situation. As it turned out the CT player didn't need to use it.
For the SF player to have survived the blast of the mine was a
stroke of luck, though to be fair, so too the CT player had his, as the mine
not only exploded with great force (6AP) as well as causing a lot of hits (10)
which was a good run of hot dice rolling! This could've unravelled the entire
SF game plan and resulted in a severe force morale loss and virtually the loss
of the scenario on that basis alone....a reason to have mine protected vehicles
like real life!!!...though off course in 1967 you can't have any :-)
As it turned out the odds swung for both sides and the SF player got
his men out relatively unscathed. Shaking his troops out into formation, laying
a fire base with his MAG gunner, ordering a quick reaction with his right wing
sweep and calling for a Casevac, he was making all the right moves....just like
he would've in a real contact. More than anything else he was trying to pin his
enemy in place so they could deliver the coup de grace, but ultimately his fire
caused an involuntary run by the T'Kongo's squad and the CTs slipped
away...albeit in a pell-mell run for their lives!!
This idea of 'find, fix, finish' is important for the SF player to
grasp, for if his fire is ineffective (low shock) and then it slackens (end of
turn) the CTs can Shumba move (be removed from play) and get away clean. They
can then re enter at another jump off point (as for a normal unit placement)
reflecting rapid unseen movement and then race to a dispersal point with their Tsuro
move (3d6" move with no shock effect)....usually not where near the SF forces
are...something for both players to consider when the final JOPs are locked
down and their subsequent in game use.
All that aside, this was been the perfect moment for the SF
player to use a Chain of Command dice to end the turn, as he did, in an attempt to force the broken CT
unit to be removed from play without it successfully bombshelling first. This would've caused a routed leader test (with a
likely drop of force morale) as well as a broken section test (for bomb shelling) which had a good chance of reducing the CT force morale from two to zero...luckliy he only lost a single morale point and got off table 'successfully' with some force morale intact....if it dropped to zero then the CT player loses.
This last point was something the SF player had to consider
because at the End of a Turn all SF casualties not yet Casevac'd must test to
see if they 'bleed out'. At this stage of the action this would have been the
second attempt and this would've mean’t there was a fair chance one or
even two SF soldiers could've died (though luckily they didn't) and this would've likely caused his force
morale to drop to zero....giving the victory to the CT player anyway, unless his morale had also dropped to zero....the only real combination for a draw in this scenario...such
were the decisions the SF player had to wrestle with!!
So as can be seen the scenario produces many, many decision points
for both players, starting right at the beginning with CT player choosing his
force to fit the type of engagement he plans on fighting. This very much
determines the type of battle that will occur. The SF player to a degree is fixed
to 'obvious' choices to enhance his standard platoon structure...though he has
a good selection to pick from.
All the above off course does not have to be aimed just at CT
attackers vs SF defenders. This scenario could easily have been played out using
an attacking force of SAS or Selous Scouts, who conducted many such
operations akin to the outpost scenario. This changes the dynamic significantly
as the SF player can really take the fight to the enemy and in fact must, as
his victory conditions revolve around reducing CT force morale to zero.....no
other victory conditions are available to him, unlike the CT player who can hit
and run...the SF must hit and fight!
.....all very interesting options and lots of possible variation
with the amount of platoon types available to both sides in the Rhodesian Bush
War.
Great AAR! One question - is 'Chain of Command Modern - Bush Wars:Rhodesia' a separate set of rules from the regular 'Chain of Command'?
ReplyDeleteThanks!
My Blog: http://blog.ryan.skow.org
Hi Ryan,
ReplyDeleteThanks!
"'Chain of Command Modern - Bush Wars:Rhodesia' a separate set of rules from the regular 'Chain of Command'? "
No. It's a (beta test) supplement for the rules covering the Bush War 1965-1979.
Cheers
Happy W
Are the beta rules publicly available anywhere?
DeleteHi David,
ReplyDeleteAt present the 'beta rules' are not available. Soon-ish we shall be casting around for some playtesters, but not just at the moment as things are still in a state of flux.
Cheers
Happy Wanderer
I'd certainly like to 'sign up' for play testing if possible. Looking forward to seeing the rule set - and, of course, more AARs from you!
DeleteGreat stuff Rolf. One more project to put off starting :)
ReplyDelete..thanks Scrivs..told you I had a few irons in the fire! I'm looking to interweave some SCW stuff in here as well as this blog is really just a place to put up thoughts and ideas to toss about...it's not just focused on the Bush War, though that is a front and centre project at the moment along with anything else that catches my eye ;-)
ReplyDeleteHappy W
Hey happy, Great game. I would be very keen to try these rules of, please consider me when looking for playtesters.
ReplyDeleteBest regards,
Craig
Tiny Terrain Models
www.wargames.blog.co.uk
Hi Craig,
ReplyDeleteNice blog you have.
I will make an 'announcement' when we move to this stage so thanks for offering and I'm sure it'll work out.
Cheers
Happy W
Great concept! Im thinking U.S.Army vs Indians or U.S. Army vs. Panch Villa, etc. By the way - what do you ue as the basic surface on your wargame table? It looks like it might be vinyl flooring. I could use that for my Naval Games!.
ReplyDeleteDick Bryant
No scenario survives first contact with a wargamer
Hi Dick,
ReplyDeleteGlad you liked the AAR.
The table surface is a purpose built 'lino' surface...it's not a lay on surface but what the tabletop is made of.......conveniently blue for naval games ;-)
Cheers
Happy W