
A quick hello back to Blogger. Wordpress was good..and then, well, it just became a pain in the backside to post with their 'improved' Gutenberg editor...so here we are back with 'ol faithful...Blogger.

In my last post (literally on Wordpress😒) I posted a battle report on the Battle of Tanagra, 457 B.C. using the Commands & Colors Ancients game with 28mm miniatures...lots of them! Commands & Colors is a fine game and much loved for its elegance, simplicity and the all encompassing nature of its subject matter using a core command (card) and colors (combat dice) system. It is however just one of several rule sets that will be able to be used for Hoplite warfare with the armies that have been arrayed.
A good while ago while starting the hoplite project I mentioned the desire to use multiple rule systems to get maximum utility out of the investment in building large and extensive armies. Another firm favourite, and friend of agrabbagofgames, is Simon Miller and his popular To the Strongest! (TtS!) rules system...rules designed for big games that can handle the types of forces our hoplite armies are made for...not always, but going big, means TtS! is part of the mix. See what going big really means at his blog.
With that in mind I thought it would be an interesting exercise to compare the same game played with the two different fast play systems that can handle fairly large numbers of ‘figures’ on the table.
So in this post I'm going detail my explorations with To the Strongest! playing the same scenario. Tanagra, as discussed in my last post, provides a good basis for hoplite engagements as it is a predominantly hoplite encounter with a sprinkling of light troops and a lone cavalry unit.
In this game however, we're not going to play in miniature, but use the commands and colours board game and components to fight the battle but using the TtS! rules set...travel To the Strongest!
Now you may say that To the Strongest! should be played on a square grid? Indeed it should! However, I happened upon a post by another To the Strongest! gamer, and his experiments proved quite successful using hexes instead of squares for TtS! The game most definitely works using a hex grid and I concur with Dave's assessment that there isn't undue added manoeuvrability of the forces involved. The following after action report pretty much proves this is indeed the case. There is also a bit of chat on the TtS! Tapatalk forum with others using hex grids as well. Given that TtS! and CCA are somewhat related this is not surprising.
To the Strongest! rules tweaks.
We played To the Strongest! using the current (standard) rules but due to the 'effect' of the hex grid and unit orientation on it we made one small adjustment.
As units now face two units to their front on the hex grid, we allow the attacking player to choose whichever one he wants to charge first but an adjacent unit(s) must ’select’ its target randomly - thus, when the unit activates it must draw an 'even score' card for the unit's activation (2,4,6,8,10) to allow the player to choose his target, otherwise the opposing player chooses. Similarly, we determine an enemy unit’s ‘ZOC’ randomly from turn to turn thus a unit may be able to rally in a hex adjacent bit to the front of an enemy unit as TtS does not allow a unit to rally in an enemy ZOC.
These two simple additions prevents two units regularly 'ganging up' on a single unit due to the hex mat layout automatically...we don't like the smell of cheese! It also, on occasion allows a unit to Rally in close proximity to the enemy without having to withdraw fro the battle line…this seems reasonable given the fluid nature of combat as it is portrayed.
To Battle!
Note - I shall, on occasion reference locations on the game board by hex Letter/Number ID as required for clarity and shown on the gameboard.
For those unacquainted with TtS! the numbered chits indicate the activation number drawn (in place of cards) that a unit needs to active ie move, shoot, rally, etc. Units may activate multiple times as long as they exceed their current activation score.
In addition, in a similar fashion to Commands & Colors, TtS! uses a 'victory banner' system. These are shown for [Athens and Sparta].
Victory
Athens - 12 Spartan victory medals
Sparta - 13 Athenian victory medals

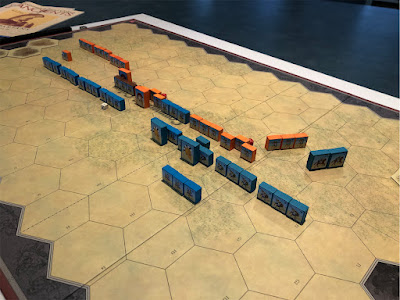
Athenian side - blocks in blue. I experimented with different sized units to achieve 'a look'. In this case all hoplite units are 4 blocks, the light infantry and cavalry are 3 blocks. Three Athenian hoplite units are rated as Panhellenic hoplites, giving them a 7+ save. The Athenian hoplites have a 6+ save.

Spartiate hoplite units in orange colored blocks.

A view of the Spartan force. The Spartiate unit (bronze block w/Nicodemes) is placed centre-right of the line, with a 5+ save. To his left is the coalition of Panhellenic hoplites, with a 7+ save. To his right are his Peloponnesian allied hoplites with 6+ save.

Version two of 'the look'.
Here I've removed the 'more blocks' look and gone for a more linear effect. This will also enable two units, a hoplite (3x1 blocks) and a light infantry unit (1x1) block to easily fit in the same hex, even if a leader is attached. The black dice shows that the light infantry, javelin unit has used one ammo point (of 3).

You can see here that the battle presents a very linear look that to my mind's eye is reflective of a long line of hoplites arrayed for battle.
 |
| Solid 'block' of hoplites in line |

Spartan left flank. Light infantry, javelin hold the left of the Spartan line, themselves to the left (flank) of the Phokean (Panhellenic) hoplites [D3]. The Thessalian cavalry is 'allied' to the Athenian side at the start of the battle - (historically they duplicitously switched sides).

The battle commences... a few turns in.
Both lines draw easy activation chits (2+) and move up to meet each other in the centre off the field. The Spartan right wing Peloponnesian allies (Anaktons and Boetians), fail their activation and dislocate the battleline (chit turned over).
The Spartan left flank is under immediate threat of overlap and the formation Taxiarch orders a withdrawal and swing to the left supported by a unit of skirmishers to refuse a flank.

After several turns of othismos (combat) the Athenian's allied leader supported with adjacent friendly hoplite attacks breaks the enemy Lokrian (Panhellenic) hoplites to their front...first blood to Athens!
[A-3; S-0]
Note - the white colored dice show current hits (red dice are used if the unit is disordered).

View from the Athenian left-rear. You can see two Spartan units are disordered (red dice) in their line. The Athenians are fighting well...their linear formation is in good shape, with one unit penetrating the Spartan line.
Athenian right-rear. The Thessalian cavalry moves into position to threaten the left of the Spartan line.

In the following turn the Spartan line recovers from disorder (red dice, now white). The Spartan right wing Peloponnesian allies (Anaktons and Boetians) pick up their feet and join the main battleline. Battle is joined all across the front with both lines shaken out and matching up their opposite numbers in combat.
Not shown, but in the preceding turn was the loss of one of each side's light infantry.
[A-4; S-1]

The two lines push and shove in fierce othismos, with both sides having success. The Athenians, having broken into the Spartan line, commence a (flanking) turn (to their right) to roll up the Spartan left weaker hoplite units. The Spartan left flank Phokean and Lokrean allied troops are under immense pressure from front, both flanks, and rear...but they stubornly fight on, saving several 'hits'.
Meanwhile Nicodemes at the head of his Spartiates breaks an Athenian unit and punches in to the Athenian centre-left, conducting a right wheel himself in an effort to sweep away the Athenian left wing.
Both lines have taken losses but the Spartan's is the more disordered.


Not to be out-done, a brave surge from the centre of the Athenian line smashes into the Lokrians, their men running but their leader able to escape the maelstrom of spear and shield and fled to a nearby unit.
[A-7; S-4]
[A-7; S-4]

Meanwhile, Nicodemes, seeing the danger drives his men on (with two activations #4 / #6) and sweeps another Athenian hoplite unit from the field.
[A-7; S-7]
[A-7; S-7]
The battleline, still linear, but now in disarray. The Spartan left flank Phokeans and Lokreans fight for their life as they repel assaults and catch their breath as their enemy fails to press their advantage (several failed activations by the Athenians here).
The Athenian centre, having been punctured by Nicodemes at the head of his elite Spartiates presses his advantage in an attempt to continue roll up the Athenian left flank but not without taking some losses by the Spartan allied Anakton and Boetian hoplites [E9, E10, E11].

The Spartan left in critical condition now - but still heroically holds out. The Athenian Arkananian allies have taken a few losses of their own resulting in a very close contest on the Athenian right/Spartan left flank. The Thessalian cavalry have failed to activate on several occasion, the Athenian commander focused solely on the hoplite engagement before him.
This, it would appear to be, is a flank of missed opportunities for the Athenian commander Myronides.
Note - three hits destroys a hoplite unit. Being disordered significantly reduces fighting ability. When disordered it is best to Rally, however as units are 'up close and personal' they suffer negative modifiers to rally so close to enemy so near at hand.

This overview shows the Spartan right flank about to overwhelm the Athenian left. The Athenian right flank, Arkananian allied hoplites, is similarly well placed to deliver a winning blow but has failed to do so thus far.
The score is neck and neck - [A-7; S-7].

Nicodemes, realising he needs to finish off the Athenian left flank if he is to have any chance of victory (activates on a #2) and immediately attacks with support from the adjacent Peloponnesian units to his right. In a blink of an eye the Arkananian unit breaks and thus collapses the Athenians centre-left flank.
[A-7; S-10].
[A-7; S-10].

Nicodemes, now realising the battle must be won by sweeping the Athenian centre from the field..must make it back in time so long as his Phokean and Lokrean allies can hold out.
Taking advantage of his very low (initial) activation score (#2) he presses his luck and gains two further activations enabling him to turn his hoplites about and march back toward the centre of the field. Only the superior drill of the Spartans enabled such a manoeuvre to be undertaken with any chance of success...on this day, Spartan drill looks like it may pay off!
Note - in our house rules we allow the Spartiates an ability to not suffer a double deep activation penalty due to their drill ability. This proved crucial in enabling the triple activation, itself a minor miracle, to place the Spartans back in the fight.

The Athenians continue to press the Spartan right in the hope of driving it off and breaking the Dorian line. Pressing hard they break a Lokrean hoplite unit bringing them ever closer to victory.
Note shown, an Athenian light infantry unit is also eliminated in a desultory, but possibly important, combat.
[A-10; S-11].
[A-10; S-11].

The battle teeters on a knife edge.
Here you can see the Nicodemes and an adjacent Peloponnesian hoplite unit pressing into the the front/flank of an Athenian hoplite unit in the centre of the battlefield. The extreme Spartan left flank, which has heroically held on under immense pressure, still holds...just.
Note - This contest was ever so close to having the Spartan allied units breaking. Only some fortunate rallying along with Athenian failed and feeble combat attacks saved them from certain disaster.
[A-10; S-11] note - Athenian victory medal total (in pic) not yet reflective of (just) routed Spartan unit.

Another view of the defeated Lokrean unit. One lone Spartan allied unit, the Phokeans, stand alone...victory in the grasp of both sides...an extremely close contest.
[A-10; S-11].


In a twist of fate, and totally in keeping with the historical event, the Thessalian cavalry draw a (#10) chit and defect to the Spartan side! They now turn on their Athenian paymasters and fight for Spartan money instead (blue blocks change to orange blocks!!)
Historically this is exactly what happened 😳...the scenario rule that allowed it to occur was the draw of an activation chit #1 or #10 - their activation counting as a 'failed activation' for the Athenian side ie confusion and treachery!!

...and as if the Thessalian cavalry could see the writing on the wall, Nicomedes (on the next chit pull) activates and charges the Athenians in the centre of the field and sends them running.
With that the Athenian army breaks and flees the field...
Victory to Sparta!
[A-10; S-14]


Postscipt
You truly could not have scripted the play to effect the outcome of the battle as it unfolded. It was virtually a re-run of the historical event as far as we know it. Historically, we know it was a very close contest and the Spartans on the day only just won their victory...and so it was in our game...literally on the last card 'pull'...excellent stuff. A testament to the historical fidelity of To the Strongest!
So how do the two games and game systems compare?
I really don’t think it’s an ‘either’ ‘or’ proposition. The two games are pitched at a different but similar game experience. In both cases, each game gave very much the same (historical) result, with the Athenians only just getting over the line for victory in CCA whereas the Spartans triumphed (just) in TtS!...both games were alot of fun. TtS! was a little bit more drawn out (ie tense) in the card activation and combat system I think. CCA played in about 1hr:30 mins and TtS! in 2hr:30 mins. If playing on a full table with miniatures I'd say TtS! take a bit longer to play.
Commands and Colors Ancients for hoplite warfare is in some respects most reliant on players accepting certain abstract elements of the CCA game system. Perhaps it is the least best historical topic for the fairly fluid flowing CCA system to reflect this type of warfare. Units can attack to the flank and rear with the same combat effect which sometimes ‘jars’ to the eye as to how units are oriented and how they fight.
To my mind this can be thought of not so much as direct combat, (possibly some), but as the effect of their presence and morale effect of penetrating an enemy line or threatening their rear being reflected through the combat dice outcomes. Flanking and breaking the enemy line was an important feature of hoplite warfare and the CCA concept of having two or three units ‘attack’ to the flank reflects this largely psychological impact.
To the Strongest! is far less abstract and more literal in its approach as to how it reflects ancient combat. Things like unit facing, disorder, the ability of light troops to (usually always) be able to be passed through other friendly units, the impact of different weapon systems on one another are all handled in a simple/elegant but more granular way. The impact of leader types vary from army to army, along with a host of other specific rules which for the most part remove the abstract elements CCA has and allow the players to get more direct feedback from player inputs.
CCA certainly relies on a broad brush (more abstract) approach using the very quick combat dice system which has an inherent abstractness but very thematic effect which delivers rapid fire action for minimal rules overhead…it’s tactile and fun to implement in play.
I would say that taken on balance To the Strongest is in no way more complicated or difficult to grasp than Commands and Colors yet delivers perhaps a more ’realistic feeling’ game that lasts a bit longer which also drives the narrative along at a nice pace.
My general feeling is that the player has more agency in TtS! than CCA. The ability to activate units and potentially do so one or more times per turn (based on chit/card draw as seen by Nicodemes' Spartans in this battle) creates a slightly more dynamic game experience. The command cards used in Commands & Colors are intuitively simple and approach the same problem of command friction in a different way. In both cases a similar effect is achieved but I'd say TtS! has a bit more player 'control and input' for an overall plan.
Both game systems play very well and Simon Miller’s approachable manner and excellent support for his game really is a boon for ancients/medieval gamers. Commands & Colors has a similar dedicated following and players are well served by both communities. Both games are very worthwhile.
Comparison
In so far as the game result and game play are concerned, it is pretty much same-same but different.
CCA is very good for thematically giving a reasonable approximation of historical outcomes with ease and simplicity of play by using the cards to create the fog-of-war with player input, which the chits also do in TtS! The very fast combat dice in CCA vs the card/chit pull method used in TtS! work equally well in each game system. In this respect both get high marks for speed and elegance of play. This can be an important factor in choosing one game over another for an evening's play and dependant on the target audience.
Obviously the principle difference between the two is the use of hexes in CCA and squares in TtS! In our game we used hexes playing TtS! and this proved totally doable…no problem. In this respect owners of CCA will have the ability to unlock the potential to use all the game components of the CCA system with all its expansions but play TtS!…essentially making TtS! into a boardgame, which others have commented on before.
This also has the great advantage of allowing players to use the CCA components to represent armies that they do not otherwise have. TtS! requires a lot of miniatures and this idea of using CCA game components fast tracks a player’s ability to game these other periods with TtS! should players wish to explore this game system. This alone is a big plus for the CCA system making it a worthy entry point for any ancients gamer.
Off course, owners of CCA will also have all the benefits of being able to play a standard CCA game when the mood or situation suits as well…two games in one and in your backpack as well! The use of the CCA Epic games, doubling the width of a standard table (26 hexes wide vs 13 hexes) provides tje opportunity for a true TtS! type experience Simon has so lovely put on on multiple occasions.
 |
| Battle of Raphia - To the Strongest - 2015 |
 |
| CCA - Epic Raphia |
In conclusion, it is fair to say that both games were a complete success and both have their advantages and disadvantages. Both delivered believable historical outcomes. Play either of them when the time and space format suits a game either in miniature (if you can) or using the Commands & Colors board game...you really do have two games in one!
 |
| Thessalian cavalry defects! |
Welcome back to the Blogosphere mate :-)
ReplyDeleteWelcome….back indeed 🤙🏻
ReplyDelete